“Mastering the Art of Assembling and Testing Electronic Components on Small PCBs”
Key Takeaways
Mastering the art of assembling and testing electronic components on small PCBs demands a keen eye for detail and an understanding of intricate processes. From choosing the right materials and tools to executing precise soldering techniques, each step contributes significantly to the reliability and functionality of your finished PCB project. Highlighted in our guide are essential practices for ensuring soldering precision, such as maintaining the correct temperature and using flux properly, which are paramount in avoiding common mistakes like cold joints or bridging. Additionally, comprehensive testing methods are discussed to help you identify and troubleshoot issues efficiently. By following these expert tips, both seasoned technicians and budding hobbyists can enhance their PCBA skills, ensuring that their compact PCB projects are executed with high standards of excellence.
Introduction to Small PCB Assembly and Testing
Printed circuit board (PCB) assembly is an integral part of modern electronics, especially when dealing with small PCBs. PCBA involves mounting electronic components onto the PCB, a task that requires precision and understanding of various techniques and tools.
When venturing into the assembly and testing of electronics on small PCBs, one must be equipped with fundamental knowledge and skills. The process begins with understanding the layout of the PCB, identifying component placement, and ensuring that each component is correctly oriented. This step is crucial for avoiding potential functional issues down the line.
“Before you start any PCB assembly, make sure to double-check your component list and layout plan,” advises electronics expert Alex Rivera.
In addition to layout planning, one should also prepare by gathering essential tools such as soldering irons, solder wire, flux, tweezers, and magnification aids. These tools are critical for achieving precise soldering on compact boards.
Further, testing assembled PCBs is a vital phase in ensuring that the circuit functions as intended. This often involves continuity checks using multimeters or oscilloscopes to verify the integrity of connections. Identifying any faults early can save time and resources by preventing more significant issues as the project progresses.
Tip: “Investing in high-quality tools may seem costly at first, but it pays off in accuracy and reliability,” notes hardware designer Lisa Nguyen.
By mastering these basic steps and gradually learning the nuances of pcba, enthusiasts can significantly improve their projects’ precision and reliability while preparing themselves for more advanced electronic endeavors.
Essential Tools and Materials for PCB Assembly
A successful PCB assembly process begins with the right tools and materials. Whether you’re building a simple device or a complex module, having high-quality equipment can make all the difference. Soldering irons with adjustable temperature settings are indispensable, offering precise control over the soldering process. Fine-tipped tweezers and soldering flux are also essential for handling and securing tiny components during assembly. A good magnifying glass or a microscope can aid in examining minute details, ensuring that every solder joint is flawless.
High-quality solder is crucial, and it’s recommended to use lead-free solders to comply with safety standards. Additionally, having a variety of resistors, capacitors, and other electronic components at your disposal is beneficial for efficient assembly. Tools like desoldering pumps or braids are useful for correcting mistakes.
For testing purposes, a reliable multimeter is an irreplaceable tool to measure voltage, current, and resistance in your circuits. An oscilloscope might also be handy for more advanced diagnostics. Component testers can quickly verify the functionality of your assembled components before comprehensive testing.
A clean working environment is also vital; therefore, investing in an anti-static mat can protect sensitive components from static damage. Finally, documentation tools like schematic software help in planning out your PCBA projects meticulously.
Overall, equipping yourself with these essential tools and materials not only facilitates the PCB assembly process but significantly improves the quality and reliability of your electronic projects.
Step-by-Step Guide to Soldering Components on Small PCBs
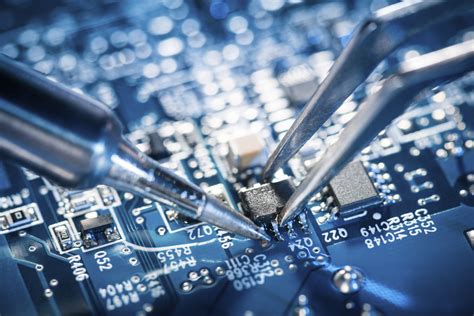
Achieving a successful PCB assembly requires a meticulous approach, especially when working with small PCBs. Begin by ensuring your workspace is well-lit and free from clutter. First, place the PCB on an anti-static mat to prevent any electrostatic discharge. Align the electronic components with their designated pads on the PCB, making sure that components such as resistors, capacitors, and ICs are correctly oriented based on their polarity.
Next, secure the components using a piece of Kapton tape if they tend to shift. Before you start soldering, preheat your soldering iron to an appropriate temperature—typically around 350°C for leaded solder and 370°C for lead-free solder. Apply a small amount of flux to the component leads and PCB pads to enhance wetting and reduce oxidation.
With your iron preheated, touch the pad and component lead simultaneously with the tip of the iron for about one second. Introduce the solder wire at the junction of the tip, pad, and lead. Allow a sufficient amount of solder to flow into place without creating bridges between adjacent pads. Remove the iron promptly but smoothly once adequate soldering is achieved.
Inspect each joint visually under magnification to ensure there are no cold joints or excess solder blobs that could cause shorts or connectivity issues. Use a multimeter in continuity mode to verify proper electrical connections across all joints post-soldering.
By following these steps with precision, you can achieve reliable PCBA results that stand up to rigorous testing and real-world applications.
Techniques for Ensuring Soldering Precision and Reliability
Achieving precision and reliability in soldering when working on small PCBs is crucial for successful pcb assembly. Here are some techniques to ensure high-quality results. First, always start with a clean workspace and organize your components to avoid any mishaps. Use a fine-tip soldering iron and maintain it at an adequate temperature—typically between 350°C and 370°C. Apply flux to both the pad and the component lead to reduce oxidation and improve solder flow.
Moreover, selecting the right type of solder is essential; a common choice is lead-free solder, which has become the standard in many applications due to its environmental benefits. When making the solder joint, use a minimal amount of solder; too much can cause bridges or shorts, while too little can lead to weak connections. It’s beneficial to use magnification tools, such as a jeweler’s loupe or microscope, to inspect your work closely.
Additionally, ensure that you have a steady hand by supporting your arm on the workbench or using tool supports. For small PCBA projects, consider using reflow techniques with a hot air gun or an oven if multiple tiny components need equidistant placement and solid joint quality.
In summary, focus on maintaining cleanliness, using appropriate tools and materials, optimizing temperature settings, and inspecting joints meticulously. These practices will significantly enhance the quality and durability of your PCB assemblies, ensuring that your electronic projects operate reliably over time.
Testing and Troubleshooting Assembled PCBs
Once your PCB assembly is complete, the next crucial step is thorough testing and troubleshooting to ensure functionality and reliability. Start by visually inspecting the assembled PCB for any obvious issues such as misplaced components, solder bridges, or cold solder joints. Use a magnifying glass or microscope to catch even the smallest defects that could potentially cause failures.
Next, proceed with using a multimeter to check for continuity, ensuring that electrical connections are intact without short circuits. By placing the multimeter probes on various points of the PCB, verify consistent current flow as per your circuit design. Any discrepancies should be noted and addressed promptly.
For more dynamic testing, a signal generator can be employed to inject signals into various parts of the circuit. Monitoring these signals with an oscilloscope will help identify any irregularities or unexpected behaviors. This step is essential in verifying that all components interact properly within the PCB assembly and adhere to design specifications.
Additionally, consider using an in-circuit tester (ICT) for automated testing of component placement and functionality. ICTs can quickly identify faults such as missing components or incorrect orientations, thus saving you time in manual troubleshooting.
Should you encounter issues during these tests, methodically isolate the problem by examining smaller sections of the board. Focus on one component at a time to understand how it interacts within the assembly. Patience and a methodical approach are key in effective PCBA troubleshooting.
In summary, meticulous testing using both basic tools like multimeters and advanced equipment like oscilloscopes ensures that your assembled PCBs meet functional requirements and maintain high standards of quality and reliability in your electronic projects.
Advanced Tips for Compact PCB Projects
To truly excel in pcb assembly for compact designs, it’s crucial to consider advanced techniques that streamline the process while maintaining high precision and reliability. One notable tip is to use a heat gun for soldering tiny components, especially when working on PCBs with limited space. This ensures a uniform temperature distribution, reducing the chances of overheating and damaging sensitive parts.
Another essential practice is to employ flux generously but judiciously; too much can cause short circuits while too little may hinder the solder’s bonding strength. Utilize magnifying tools or microscopes to inspect every solder joint meticulously. They help identify cold joints or insufficient solder deposits which may lead to future failures.
Integrating automated test equipment (ATE) into your workflow can significantly enhance testing accuracy. These systems are particularly useful in identifying defects that are not visible to the naked eye, ensuring that your assembled PCBs are fully functional before deployment.
Pay attention to component orientation during assembly; misaligned parts can compromise the performance and reliability of your PCB. Additionally, consider using low-temperature solders for components that are particularly heat-sensitive.
Handling and storing components with proper anti-static measures is vital for preventing electrostatic discharge (ESD) damage, which could impair the functionality of assembled PCBs over time. Lastly, maintain a detailed log of your assembly and testing results; it can be an invaluable resource for troubleshooting recurrent issues and optimizing your future processes.
By integrating these advanced tips into your workflow, you can significantly improve the efficiency and reliability of your pcba process, ensuring top-notch results in even the most compact PCB projects.
Common Mistakes to Avoid in PCB Assembly and Testing
When engaging in PCB assembly and testing, it’s crucial to avoid some common pitfalls that can compromise the reliability and functionality of your PCBs. One major mistake is poor soldering techniques, which can lead to weak connections or electrical shorts. Ensuring proper heat management during soldering is essential; overheating components can damage them, while insufficient heat may result in cold solder joints. Another frequent error is the incorrect placement of components, which can be mitigated by double-checking component orientation and placement before soldering. Additionally, not cleaning the PCB after soldering can leave behind flux residues that may cause corrosion or electrical leakage over time.
Inadequate testing procedures are another critical mistake. Comprehensive testing should include visual inspections for solder bridges or missing components, as well as electrical tests to verify correct connections and functionality. Neglecting to follow a methodical testing strategy can lead to undetected faults that could compromise your entire project.
Using substandard or inappropriate materials can also present significant issues in PCBA. Always ensure that you are using high-quality solder and flux, and verify that the components meet required specifications for your particular project.
By being aware of these common mistakes and taking proactive steps to avoid them, you will enhance the precision and reliability of your PCB assembly efforts. This not only ensures a successful project but also hones your skills for future electronic endeavors.
Final Thoughts and Best Practices
Mastering pcb assembly requires not only technical proficiency but also adherence to best practices that ensure the reliability and performance of your projects. One of the most critical aspects is maintaining a clean and organized workspace. This helps in preventing contamination of components and ensures that you can easily locate tools and parts during the assembly process. Always use quality components and reliable pcba tools to avoid issues down the line. Furthermore, employing a systematic approach to testing your assembled boards can help identify potential faults early, making troubleshooting more efficient. Regularly calibrate your soldering tools to maintain consistent temperatures, which is essential for precise soldering on small PCBs. Lastly, never rush through the process; taking your time can significantly reduce errors and enhance the overall quality of your work. By following these best practices, you can elevate your skills from merely adequate to exceptional in the pcb assembly realm.
Conclusion
In mastering PCB assembly and PCBA processes for small printed circuit boards, precision and attention to detail are paramount. By diligently following these comprehensive steps and best practices, you ensure that your PCB assembly projects are of the highest quality, whether for professional applications or personal endeavors. The use of high-quality tools, a steady hand, and consistent testing will enhance the reliability and longevity of your assembled circuits. Embrace the challenges and intricacies of working on small PCBs, as each project offers a valuable learning experience that sharpens your skills and contributes to your growth as a proficient electronics enthusiast or technician.
FAQs
Navigating the intricacies of PCB assembly can be daunting. Below, we address some frequently asked questions to help clarify the process:
What is PCB assembly (PCBA)?
Assembly of printed circuit boards (PCBA) refers to the process of attaching electronic components to a printed circuit board (PCB). This can involve various methods, such as soldering, to ensure components are securely connected and functional.
What tools are necessary for small PCB assembly?
For successful PCB assembly, essential tools include a soldering iron, solder wire, tweezers, magnifying glass or microscope, multimeter for testing, and other hand tools like wire strippers and cutters. Using quality tools ensures precision and reliability.
How can I ensure precise soldering on small PCBs?
Precision in soldering is critical for the functionality of a PCBA. This involves steady hands, quality tools, and proper techniques such as using the right amount of solder and ensuring all connections are clean and secure. Practicing on scrap boards can improve your skills.
What common mistakes should I avoid during PCB assembly?
Common errors in PCB assembly include overheating components while soldering, using too much or too little solder, and not testing connections properly. Ensuring cleanliness before starting the process can also prevent issues related to poor contact or short circuits.
Are there advanced tips for more complex PCB projects?
For more advanced projects involving compact PCBs, considerations such as choosing appropriate component sizes, advanced testing methodologies like automated optical inspection (AOI), and effective thermal management are crucial. Proper planning can significantly enhance the performance and reliability of your projects.
Want more insights on pcb assembly?
For comprehensive guidance on PCB assembly techniques and best practices,
please click here.
These resources provide further details that will expand your understanding and proficiency in assembling electronic components.


