Flex pcb soldering
Best Practices For Flex PCB Soldering
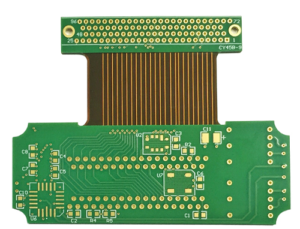
Flex PCB soldering is a critical process in the manufacturing of flexible printed circuit boards, which are increasingly used in various high-tech applications due to their lightweight, compact, and versatile nature.
To ensure the reliability and performance of these circuits, it is essential to adhere to best practices during the soldering process. This article outlines several key practices that can significantly enhance the quality and durability of flex PCB soldering.
First and foremost, it is crucial to select the appropriate materials.
The choice of solder, flux, and soldering equipment can greatly influence the outcome. Lead-free solders, such as those composed of tin, silver, and copper, are commonly used due to their environmental benefits and compliance with regulations like RoHS. However, these solders typically require higher temperatures, which can pose a risk to the delicate flex PCB materials. Therefore, it is important to use a soldering iron with precise temperature control to avoid damaging the board.
In addition to selecting the right materials, proper preparation of the flex PCB is essential.
This involves cleaning the board to remove any contaminants that could interfere with the soldering process. A clean surface ensures better adhesion of the solder and reduces the likelihood of defects such as cold joints or solder bridges. Isopropyl alcohol is often used for cleaning, as it effectively removes oils, dust, and other residues without leaving harmful residues.
Once the board is prepared, the next step is to apply flux.
Flux serves multiple purposes: it cleans the metal surfaces, prevents oxidation during soldering, and improves the flow of solder. It is important to choose a flux that is compatible with the solder and the materials of the flex PCB. Applying the right amount of flux is also critical; too little can result in poor solder joints, while too much can cause bridging and other issues.
When it comes to the actual soldering process, temperature control is paramount.
Flex PCBs are more sensitive to heat than their rigid counterparts, so it is essential to use a soldering iron with adjustable temperature settings. Preheating the board can help to reduce thermal shock and ensure a more uniform temperature distribution. This can be achieved using a preheating station or a hot air rework station. Additionally, using a lower temperature for a longer duration can help to minimize the risk of damaging the board.
Another important consideration is the use of proper soldering techniques.
For instance, the drag soldering method, where the soldering iron is dragged across the pads and leads, can be effective for flex PCBs. This technique allows for better control and reduces the risk of applying excessive heat to any single point. It is also advisable to use a fine-tipped soldering iron to achieve precise and clean solder joints.
After soldering, it is essential to inspect the solder joints for any defects.
Common issues include cold joints, which appear dull and grainy, and solder bridges, where excess solder creates an unintended connection between adjacent pads. Visual inspection, often aided by magnification tools, can help to identify these defects. In some cases, more advanced inspection methods, such as X-ray or automated optical inspection (AOI), may be necessary to ensure the integrity of the solder joints.
Finally, cleaning the board after soldering is a crucial step to remove any residual flux and other contaminants.
This helps to prevent corrosion and ensures the long-term reliability of the flex PCB. Specialized cleaning solutions and ultrasonic cleaners can be used for this purpose.
In conclusion, adhering to best practices in flex PCB soldering is essential for achieving high-quality and reliable connections. By carefully selecting materials, preparing the board, controlling temperature, using proper techniques, and conducting thorough inspections, manufacturers can significantly enhance the performance and durability of their flex PCBs.
Common Mistakes In Flex PCB Soldering And How To Avoid Them
Flex PCB soldering is a critical process in the manufacturing of flexible printed circuit boards, which are increasingly used in various high-tech applications due to their versatility and space-saving properties.
However, the process is fraught with potential pitfalls that can compromise the integrity and functionality of the final product. Understanding common mistakes and how to avoid them is essential for ensuring high-quality outcomes.
One prevalent mistake in flex PCB soldering is the improper handling of the flexible substrate
Unlike rigid PCBs, flex PCBs are more susceptible to damage from bending and twisting. Excessive handling or improper storage can lead to micro-cracks or delamination, which can severely affect the board’s performance. To mitigate this risk, it is crucial to handle flex PCBs with care, using appropriate tools and techniques to minimize physical stress. Additionally, storing them in a flat, static-free environment can help preserve their integrity.
Another common error is the use of inappropriate soldering temperatures.
Flex PCBs often have different thermal properties compared to their rigid counterparts, and applying excessive heat can cause warping or damage to the substrate. It is essential to use a soldering iron with precise temperature control and to follow the manufacturer’s recommended temperature settings. Preheating the board can also help in achieving a more uniform temperature distribution, thereby reducing the risk of thermal damage.
Furthermore, inadequate flux application is a frequent issue that can lead to poor solder joints.
Flux is essential for removing oxidation from the metal surfaces and ensuring a strong bond between the solder and the components. However, using too little flux can result in weak joints, while excessive flux can cause contamination and corrosion. To avoid these problems, it is important to apply the right amount of flux uniformly across the soldering area. Using a flux pen or a controlled dispensing system can help achieve this balance.
In addition to flux application, the choice of solder is another critical factor.
Lead-free solders, which are commonly used due to environmental regulations, have different melting points and flow characteristics compared to traditional lead-based solders. Using the wrong type of solder can result in poor wetting and weak joints. Therefore, it is essential to select a solder that is compatible with the materials and components used in the flex PCB. Consulting the manufacturer’s guidelines and conducting preliminary tests can help in making the right choice.
Moreover, insufficient cleaning after soldering is a mistake that can lead to long-term reliability issues.
Residual flux and other contaminants can cause corrosion and electrical leakage, compromising the performance of the flex PCB. Thorough cleaning using appropriate solvents and techniques is necessary to remove all residues. Automated cleaning systems or ultrasonic cleaners can be particularly effective in ensuring a contaminant-free board.
Lastly, inadequate inspection and testing can result in undetected defects that may lead to failures in the field.
Visual inspection, while useful, is often insufficient for identifying all potential issues. Implementing advanced inspection techniques such as X-ray imaging and automated optical inspection (AOI) can help in detecting hidden defects. Additionally, functional testing of the assembled flex PCB can ensure that it meets all performance specifications before it is deployed.
In conclusion, avoiding common mistakes in flex PCB soldering requires a combination of careful handling, precise temperature control, appropriate flux and solder selection, thorough cleaning, and rigorous inspection. By adhering to these best practices, manufacturers can significantly enhance the quality and reliability of their flex PCBs, ensuring they meet the high standards required in today’s advanced electronic applications.
Essential Tools For Flex PCB Soldering
Flex PCB soldering is a specialized process that requires a precise set of tools to ensure successful and reliable connections. The unique properties of flexible printed circuit boards (PCBs) necessitate the use of specific equipment and materials to handle their delicate nature. Understanding the essential tools for flex PCB soldering is crucial for anyone involved in electronics manufacturing or repair.
To begin with, a high-quality soldering iron is indispensable.
Unlike traditional PCBs, flex PCBs are more susceptible to heat damage due to their thin and flexible substrate. Therefore, a soldering iron with adjustable temperature control is essential. This allows the user to set the appropriate temperature, typically lower than that used for rigid PCBs, to avoid damaging the flex material. Additionally, a fine-tipped soldering iron is recommended to provide precision and control, which is particularly important when working with the small and densely packed components often found on flex PCBs.
In conjunction with a soldering iron, solder wire is another critical tool.
For flex PCB soldering, it is advisable to use a solder wire with a lower melting point, such as a lead-free solder alloy containing tin, silver, and copper. This type of solder wire not only reduces the risk of heat damage but also ensures strong and reliable joints. Furthermore, the use of flux-core solder wire can be beneficial as it helps to clean the surfaces being soldered and promotes better wetting, leading to improved solder joint quality.
A soldering station equipped with a temperature-controlled hot air rework tool is also highly valuable.
This tool is particularly useful for soldering and desoldering surface-mount components on flex PCBs. The hot air rework tool allows for precise control of airflow and temperature, enabling the user to heat components evenly without direct contact, thereby minimizing the risk of damaging the flex substrate. Additionally, it can be used to reflow solder paste, which is often applied to flex PCBs before component placement.
Another essential tool is a magnification device, such as a stereo microscope or a high-quality magnifying lamp.
Given the small size and fine pitch of components on flex PCBs, magnification is crucial for accurate soldering and inspection. A stereo microscope provides a three-dimensional view, allowing for better depth perception and precision when soldering. On the other hand, a magnifying lamp offers a more affordable option while still providing adequate magnification for most tasks.
To complement these tools, a set of fine-tipped tweezers is necessary for handling small components.
Tweezers with anti-static properties are particularly important to prevent electrostatic discharge (ESD) damage to sensitive electronic components. Additionally, a good pair of tweezers allows for precise placement and alignment of components, which is essential for achieving reliable solder joints.
Lastly, a high-quality soldering mat or work surface is essential to protect both the flex PCB and the workbench.
A heat-resistant and anti-static mat provides a safe and stable surface for soldering, reducing the risk of accidental damage to the flex PCB. Moreover, it helps to keep the work area organized and free from contaminants that could interfere with the soldering process.
In conclusion, successful flex PCB soldering requires a combination of specialized tools designed to handle the unique challenges posed by flexible substrates. A temperature-controlled soldering iron, appropriate solder wire, a hot air rework tool, magnification devices, fine-tipped tweezers, and a protective work surface are all essential for achieving reliable and high-quality solder joints. By investing in these tools and understanding their importance, one can ensure the integrity and performance of flex PCBs in various electronic applications.
Step-By-Step Guide To Flex PCB Soldering
Flex PCB soldering is a meticulous process that requires precision and attention to detail. To ensure a successful outcome, it is essential to follow a systematic approach. The first step in this process involves preparing the workspace. A clean, well-lit area free from dust and contaminants is crucial. Additionally, having the right tools on hand, such as a soldering iron with a fine tip, solder wire, flux, tweezers, and a magnifying glass, is imperative for achieving optimal results.
Once the workspace is prepared, the next step is to handle the flex PCB with care.
Flex PCBs are more delicate than their rigid counterparts, and improper handling can lead to damage. It is advisable to use anti-static gloves and handle the PCB by its edges to avoid contaminating the surface with oils from your fingers. Before proceeding with soldering, it is essential to inspect the flex PCB for any visible defects or contaminants. Cleaning the PCB with isopropyl alcohol can help remove any residues that might interfere with the soldering process.
Following the inspection and cleaning, the next step is to apply flux to the areas where soldering will occur.
Flux is a chemical cleaning agent that helps remove oxidation from the metal surfaces, ensuring a strong bond between the solder and the components. Applying a small amount of flux to the pads and component leads will facilitate better solder flow and adhesion. It is important to use the appropriate type of flux for the specific soldering application, as different types of flux are designed for different purposes.
With the flux applied, the next step is to position the components on the flex PCB.
Using tweezers, carefully place each component in its designated location, ensuring proper alignment with the pads. This step requires a steady hand and keen attention to detail, as misalignment can lead to poor electrical connections or short circuits. Once the components are in place, it is time to begin soldering.
To start soldering, heat the soldering iron to the appropriate temperature, typically between 300°C and 350°C, depending on the type of solder being used.
Touch the soldering iron tip to the pad and the component lead simultaneously, allowing both to heat up. Once heated, introduce the solder wire to the joint, allowing it to flow and form a solid connection. It is important to avoid applying excessive solder, as this can create unwanted bridges between adjacent pads. A small, shiny, and smooth solder joint is indicative of a good connection.
After soldering all the components, it is crucial to inspect the solder joints for any defects.
Using a magnifying glass, examine each joint for proper solder flow and adhesion. Look for any cold joints, which appear dull and grainy, as these can lead to unreliable connections. If any defects are found, rework the joints by reheating and applying additional solder as needed.
Finally, once all solder joints have been inspected and verified, it is important to clean the flex PCB to remove any residual flux.
Flux residues can be corrosive and may affect the long-term reliability of the solder joints. Using a flux remover or isopropyl alcohol, carefully clean the PCB, ensuring all residues are removed.
In conclusion, flex PCB soldering is a detailed process that requires careful preparation, precise handling, and thorough inspection. By following these steps and maintaining a methodical approach, one can achieve reliable and high-quality solder joints on flex PCBs.