LED Tube Light PCB Assembly: A Comprehensive Guide
Introduction
LED tube lights have become increasingly popular in recent years due to their energy efficiency, long lifespan, and environmental benefits. At the heart of every LED tube light is the Printed Circuit Board (PCB), which plays a crucial role in the performance and reliability of the light. This article will delve into the intricacies of LED tube light PCB assembly, covering everything from the components used to the assembly process, quality control, and future trends.
1. Understanding LED Tube Light PCBs
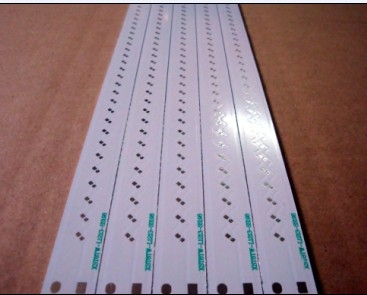
1.1 What is an LED Tube Light PCB?
An LED tube light PCB is a specialized circuit board designed to hold and connect the various electronic components that make up an LED tube light. The PCB provides the necessary electrical connections and mechanical support for the LEDs, drivers, and other components, ensuring that the light functions efficiently and reliably.
1.2 Types of PCBs Used in LED Tube Lights
There are several types of PCBs used in LED tube lights, each with its own advantages and disadvantages:
- Single-layer PCBs: These are the simplest and most cost-effective type of PCB, consisting of a single layer of conductive material. They are suitable for basic LED tube lights with fewer components.
- Double-layer PCBs: These PCBs have two layers of conductive material, allowing for more complex circuits and higher component density. They are commonly used in mid-range LED tube lights.
- Multi-layer PCBs: These PCBs have three or more layers of conductive material, enabling even more complex circuits and higher component density. They are used in high-end LED tube lights with advanced features.
- Flexible PCBs: These PCBs are made from flexible materials, allowing them to bend and conform to different shapes. They are used in LED tube lights with unique designs or those that require flexibility.
2. Components of an LED Tube Light PCB
2.1 LEDs (Light Emitting Diodes)
LEDs are the primary light source in an LED tube light. They are semiconductor devices that emit light when an electric current passes through them. The type, size, and number of LEDs used on the PCB will determine the brightness, color temperature, and overall performance of the tube light.
2.2 LED Drivers
LED drivers are essential components that regulate the power supply to the LEDs. They convert the incoming AC voltage to the appropriate DC voltage required by the LEDs, ensuring stable and consistent light output. LED drivers also protect the LEDs from voltage fluctuations and surges, extending their lifespan.
2.3 Resistors and Capacitors
Resistors and capacitors are passive components that play a crucial role in the electrical circuit of the LED tube light. Resistors limit the current flow, while capacitors store and release electrical energy. Together, they help stabilize the circuit and ensure proper functioning of the LEDs.
2.4 Diodes and Transistors
Diodes and transistors are semiconductor devices that control the flow of electrical current in the circuit. Diodes allow current to flow in one direction only, while transistors can amplify or switch electronic signals. These components are essential for the proper operation of the LED driver and other circuit elements.
2.5 Connectors and Wiring
Connectors and wiring are used to establish electrical connections between the PCB and other components of the LED tube light, such as the power supply and housing. High-quality connectors and wiring are essential for ensuring reliable electrical connections and minimizing the risk of short circuits or other electrical issues.
3. The LED Tube Light PCB Assembly Process
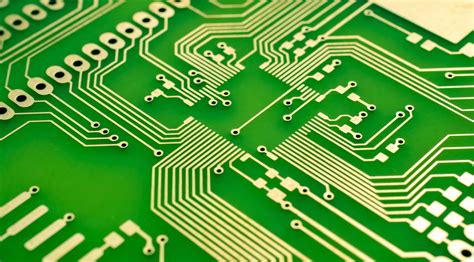
3.1 PCB Design and Layout
The first step in the LED tube light PCB assembly process is the design and layout of the PCB. This involves creating a schematic diagram of the circuit and then translating it into a physical layout using PCB design software. The layout must take into account the placement of components, routing of traces, and thermal management to ensure optimal performance and reliability.
3.2 Component Sourcing and Procurement
Once the PCB design is finalized, the next step is to source and procure the necessary components. This includes LEDs, drivers, resistors, capacitors, diodes, transistors, connectors, and wiring. It is essential to source high-quality components from reputable suppliers to ensure the reliability and longevity of the LED tube light.
3.3 PCB Fabrication
The PCB fabrication process involves creating the physical PCB based on the design and layout. This typically involves the following steps:
- Substrate Preparation: The base material (usually fiberglass) is prepared and coated with a layer of conductive material (usually copper).
- Etching: The unwanted copper is removed from the substrate using a chemical etching process, leaving behind the desired circuit traces.
- Drilling: Holes are drilled into the PCB for mounting components and creating vias (electrical connections between layers).
- Plating: The holes and vias are plated with conductive material to ensure proper electrical connections.
- Solder Mask Application: A solder mask is applied to the PCB to protect the circuit traces and prevent solder bridges during assembly.
- Silkscreen Printing: Component labels and other markings are printed onto the PCB using a silkscreen process.
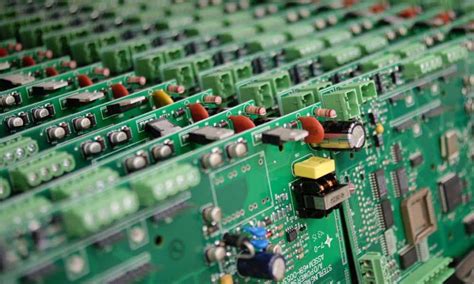
3.4 Component Placement
Once the PCB is fabricated, the next step is to place the components onto the board. This can be done manually for small-scale production or using automated pick-and-place machines for larger-scale production. The components are placed onto the PCB according to the design layout, and their leads are inserted into the corresponding holes or pads.
3.5 Soldering
After the components are placed, the next step is to solder them onto the PCB. This can be done using various soldering techniques, including:
- Wave Soldering: The PCB is passed over a wave of molten solder, which solders the components to the board.
- Reflow Soldering: The PCB is passed through a reflow oven, where the solder paste melts and solders the components to the board.
- Hand Soldering: Individual components are soldered to the PCB using a soldering iron. This is typically used for small-scale production or for components that cannot withstand the high temperatures of wave or reflow soldering.
3.6 Inspection and Testing
After soldering, the PCB undergoes inspection and testing to ensure that all components are properly soldered and that the circuit functions as intended. This may include:
- Visual Inspection: The PCB is visually inspected for any soldering defects, such as solder bridges, cold joints, or missing components.
- Automated Optical Inspection (AOI): An automated system uses cameras and software to inspect the PCB for defects.
- X-ray Inspection: X-ray imaging is used to inspect hidden solder joints, such as those under Ball Grid Array (BGA) components.
- Functional Testing: The PCB is powered on and tested to ensure that it functions as intended. This may include testing the brightness, color temperature, and power consumption of the LED tube light.
3.7 Final Assembly
Once the PCB has passed inspection and testing, it is assembled into the final LED tube light. This typically involves mounting the PCB into the tube light housing, connecting it to the power supply, and sealing the housing to protect the internal components.
4. Quality Control in LED Tube Light PCB Assembly
4.1 Importance of Quality Control
Quality control is a critical aspect of LED tube light PCB assembly. It ensures that the final product meets the required standards for performance, reliability, and safety. Poor quality control can lead to defective products, increased failure rates, and potential safety hazards.
4.2 Quality Control Measures
Several quality control measures are implemented throughout the LED tube light PCB assembly process, including:
- Incoming Component Inspection: All components are inspected upon arrival to ensure they meet the required specifications and are free from defects.
- In-process Inspection: The PCB is inspected at various stages of the assembly process to identify and correct any defects early on.
- Final Inspection and Testing: The completed PCB undergoes a final inspection and testing to ensure it meets all quality standards before being assembled into the final product.
- Environmental Testing: The LED tube light may be subjected to environmental testing, such as temperature cycling, humidity testing, and vibration testing, to ensure it can withstand real-world conditions.
- Compliance Testing: The LED tube light is tested to ensure it complies with relevant industry standards and regulations, such as UL, CE, and RoHS.
5. Challenges in LED Tube Light PCB Assembly
5.1 Thermal Management
One of the biggest challenges in LED tube light PCB assembly is thermal management. LEDs generate heat during operation, and if not properly managed, this heat can lead to reduced performance, shortened lifespan, and even failure of the LEDs. Effective thermal management involves designing the PCB with adequate heat dissipation features, such as thermal vias, heat sinks, and proper component placement.
5.2 Component Miniaturization
As LED technology advances, there is a trend towards smaller and more compact LED tube lights. This presents a challenge in PCB assembly, as it requires the use of smaller components and more precise placement techniques. Component miniaturization also increases the risk of soldering defects and makes inspection and testing more difficult.
5.3 Cost Control
Cost control is another challenge in LED tube light PCB assembly. The cost of components, materials, and labor can add up quickly, especially for high-quality products. Manufacturers must balance cost control with the need to produce reliable and high-performing LED tube lights.
5.4 Supply Chain Management
The global nature of the electronics industry means that components and materials are often sourced from multiple suppliers around the world. This can lead to challenges in supply chain management, such as delays, quality issues, and price fluctuations. Effective supply chain management is essential for ensuring a steady supply of high-quality components and materials.
6. Future Trends in LED Tube Light PCB Assembly
6.1 Advanced Materials
The use of advanced materials in LED tube light PCBs is expected to increase in the future. These materials offer improved thermal conductivity, electrical performance, and durability, leading to more efficient and reliable LED tube lights. Examples of advanced materials include metal-core PCBs, ceramic PCBs, and high-temperature laminates.
6.2 Smart LED Tube Lights
The integration of smart technology into LED tube lights is another emerging trend. Smart LED tube lights can be controlled remotely via smartphones or other devices, allowing for features such as dimming, color changing, and scheduling. This requires more advanced PCBs with additional components, such as microcontrollers, wireless modules, and sensors.
6.3 Automation and Industry 4.0
Automation and Industry 4.0 technologies are transforming the LED tube light PCB assembly process. Automated assembly lines, robotic systems, and AI-powered inspection systems are becoming more common, leading to increased efficiency, precision, and quality. Industry 4.0 technologies, such as IoT and big data analytics, are also being used to optimize the assembly process and improve supply chain management.
6.4 Sustainability
Sustainability is becoming an increasingly important consideration in LED tube light PCB assembly. Manufacturers are looking for ways to reduce the environmental impact of their products, such as using eco-friendly materials, reducing energy consumption, and implementing recycling programs. This trend is driven by both regulatory requirements and consumer demand for more sustainable products.
Conclusion
LED tube light PCB assembly is a complex and multifaceted process that requires careful attention to detail, quality control, and innovation. From the design and layout of the PCB to the sourcing of components, soldering, and final assembly, each step plays a crucial role in the performance and reliability of the final product. As technology continues to advance, we can expect to see further improvements in materials, automation, and sustainability, leading to even more efficient and reliable LED tube lights. By staying abreast of these trends and challenges, manufacturers can continue to produce high-quality LED tube lights that meet the needs of consumers and contribute to a more sustainable future.