Application of Query Statement in PCB DesignElectronic Engineer • Author:
In Altium Designer, design rules are usually used to define the user’s design requirements. These rules cover all aspects of the design, from wiring width, object safety spacing, inner layer connection style, via style, etc. Design rules can not only be detected in real time during the PCB design process, but also can be uniformly batch tested and error reports can be generated when needed.
Altium Designer’s design rules are not attributes of PCB objects, but are defined independently. Each rule must be targeted at a specific PCB object. For the PCB rule system, it must know which objects a given rule applies to, that is, the scope of application of the rule. Rules and rule scopes can be set in the PCB Rules and Constraints Editor dialog box. Among them, the use of writing query statements to define the scope is a frequently used and very important method.
Query statements are descriptions of rule application objects. The constraint objects of the design rules can be directly entered into the query statement manually, or selected in the control area on the left side of the language editing area, or defined using the query statement builder.
How is the query statement organized?
The query statement is actually an instruction of the software, defining a series of target design objects. The query statement consists of the query keywords. The following is an example of a query statement:
InNet(‘GND’) And OnLayer(‘TopLayer’)
If the query statement is used to define the range in the width rule, when the designer switches to the top layer to route the GND network, the width of the trace will automatically convert to the width value specified by the rule. If a design rule check (DRC) is performed, any GND network on the top layer must meet this width rule, otherwise it will be marked as a violation of the design rule.
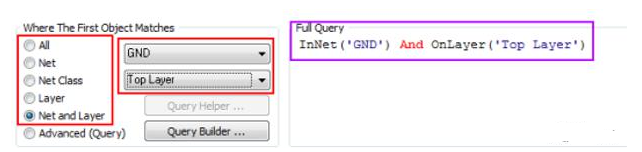
Use the options in the PCB Rules and Constraints Editor dialog box to create a query statement. Depending on whether the rule is unary or binary, the user may need to define one or two object ranges accordingly. In the PCB Rules and Constraints Editor, simple query statements have the following types of range options.
All design objects
All objects in the specified network
All objects in the specified network class
All objects on the specified layer
All objects on the specified layer and belonging to the specified network
Select any of these options and, if necessary, use the drop-down menu on the right to select the appropriate target, such as a network or a layer. The query statement will automatically appear on the right side of the Full Query area. As shown below.
Advanced Query The Advanced (Query) option allows designers to write their own more complex but more precise query statements. Designers can directly enter custom query statements for rule ranges in the Full Query area. There are two tools (Query Builder and Query Helper) to help create advanced query statements. These two tools are very useful when you are unsure of the query statement syntax or the keywords you need to use.
Query Builder defines rule scope
Query Builder is a simpler way to create query statements. It allows designers to use sensitive condition types and values but only use relevant “components”. For the creation of advanced query statements, you can use Query Helper to query keyword descriptions and operator syntax.
Click the Query Builder button to open the Building Query from Board dialog box, which allows users to construct strings through symbols such as AND or OR, so as to create query statements pointing to specific objects in the design document. As shown in the figure below.
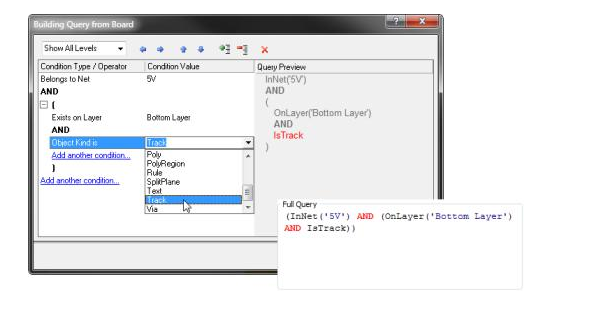
In the left part of the dialog box, users can specify the required condition type for a group of objects. When the user defines the conditions in the left half of the dialog box, the currently created query statement can be previewed in the right half. Users can continue to add more conditions as needed to narrow the user’s design object target range.
Get help from Query Helper
To use Query Helper, first select the Advanced (Query) option, and then click the Query Helper button to open the Query Helper dialog box. The query engine behind the system will analyze the PCB design and then list all available objects and common keywords used in the query statement. As shown in the figure below.
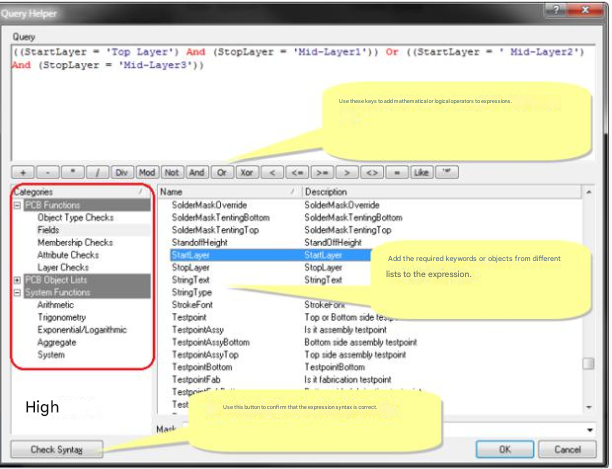
Use the Query area of the dialog box to construct a query expression statement. By default, the expression of the current valid rule range will be displayed in this area. Users can enter directly in this area. As the user types, the IntelliSense function will prompt the user with a list of possible keywords or objects based on the user’s input.
The Categories area circled in red in the lower left corner of the dialog box provides PCB functions, PCB object lists, and system functions that can be used to create query statements. When the user clicks on a subcategory in these three categories, the area on the right will display the corresponding keyword or object list. Find the keyword or object required for the query statement, then double-click the entry, and the entry will be inserted into the current cursor of the query expression in the upper area.
When the Query Statement Has an Error
If the syntax of the query statement you typed is incorrect, the rule will be highlighted in red in the left area of the PCB Rules and Constraints Editor dialog box. It is very important to correct such errors in time, otherwise online real-time detection will be very slow. Because a rule range with syntax errors will greatly reduce the speed of online or batch DRC analysis. The system will also pop up an error dialog box when you try to close the rule setting box. So make sure the syntax of all rule ranges is correct!
Using query statements in the PCB Filter panel
In the same way, you can use query statements in the filter panel to find a specified series of objects, and then define the objects to which each rule applies.
The PCB Filter panel provides users with a way to create design rules. The scope of application of the created design rules will be defined using the query statement currently defined in the central area of the panel.
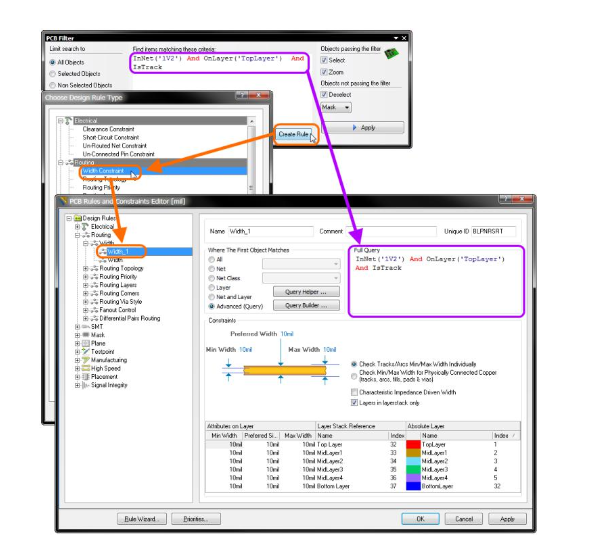
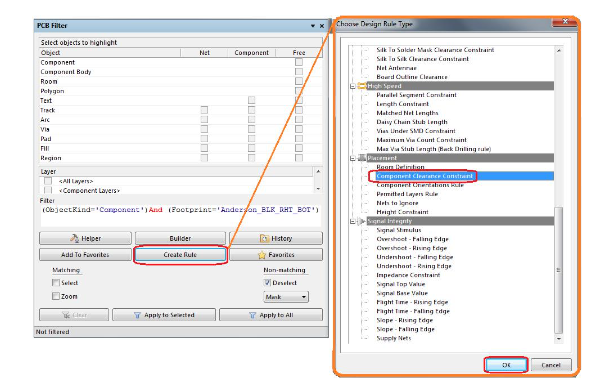
As shown in the figure above. To add a new design rule, just click the Create Rule button and the Choose Design Rule Type dialog box will be displayed. This dialog box lists all the rule categories and rule types available in the PCB document. Users only need to select the rule type they want to create and click OK (or directly double-click the rule type entry).
At this time, the PCB Rules and Constraints Editor dialog box will be displayed. In this dialog box, the system has created a rule of this type for the user and displayed the rule in the main editing window, waiting for the user to define specific constraints for this rule. The query statement from the PCB Filter panel has also been displayed in the Full Query area in the dialog box as the scope of application of this rule.
Using Query Helper to create a query statement case
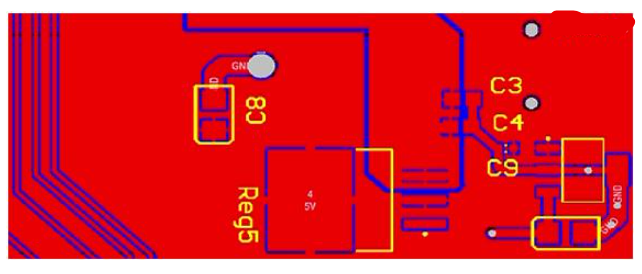
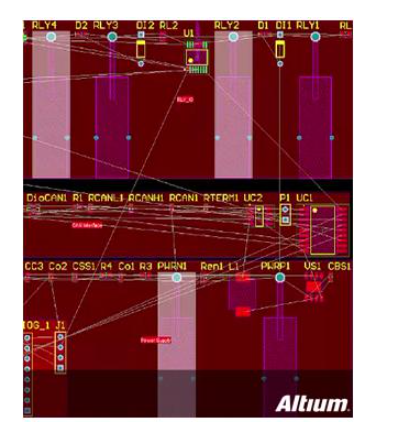
Case reason: There are many rule settings in the PCB design of a certain project, especially in terms of spacing. Since the 12V network requires a larger spacing rule, a 20mil safety distance has been set for it.
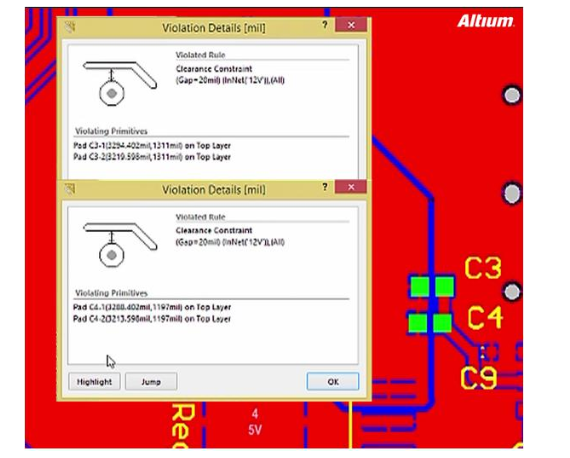
Then after the PCB is completed, the rules are checked and 2 violation information appears. As shown in the figure above. The two capacitors C3 and C4 violate the rules and are highlighted in green. The reason is that the pad shapes of these capacitors are fixed. There is no way to change it. We can only modify the rule settings to adapt to these two capacitors. Open the spacing rule settings for the 12V network and modify the rule range to exclude these two capacitors. The operation is as follows.
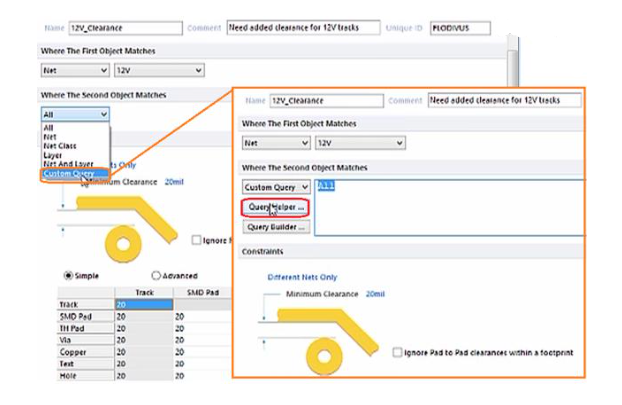
When setting, you need to uncheck C3 and C4 at the second object “Where the second object matches”. That is, exclude the two components C3 and C4 from the 20mil spacing rule constraint. Click the custom statement “Custom Query” and then select “Query Helper”.
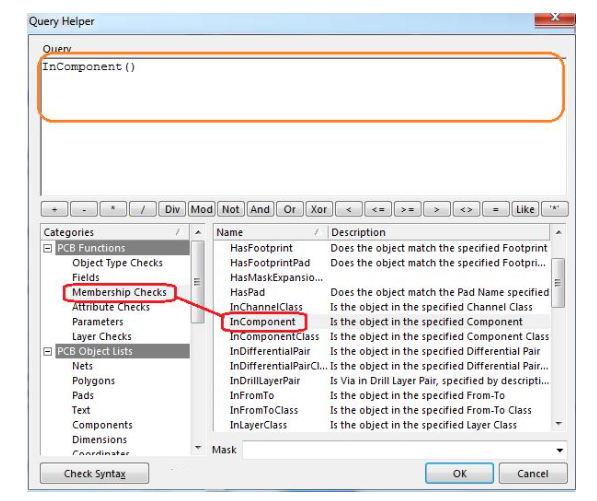
Find the “Component membership” statement and add it to the rule. We double-click the “In Component” entry to add it to the statement dialog box.
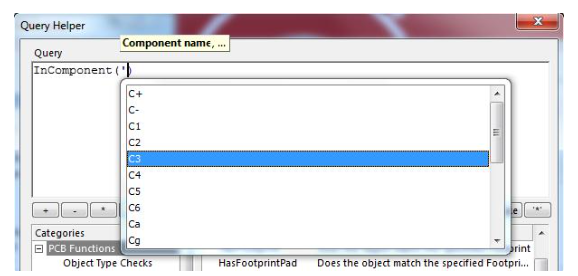
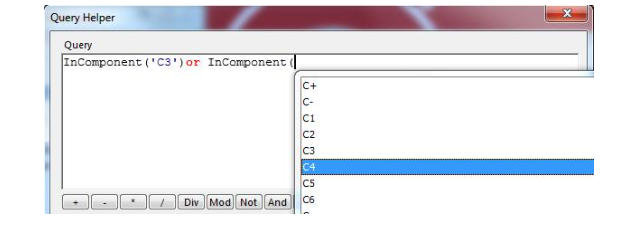
Then move to the statement “Query” dialog box, type a single quote in the brackets, a list will pop up, select C3.
Then add “Or” to the statement, and then continue, we first type “In”. Then select the required entry “In component”. This time select C4.
Now we have selected C3 or C4. The next thing to do is that the scope of the rule setting does not include these two capacitors. So we add the logical negation “Not”. Click OK to add the rule statement.
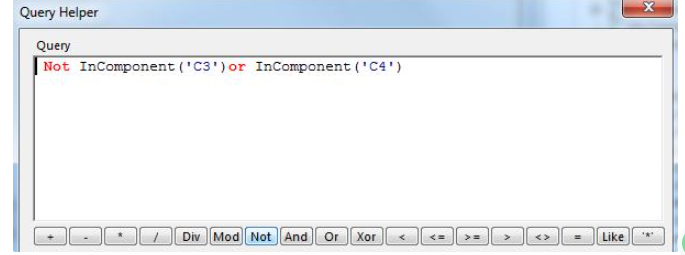
Then apply it to the rule setting. The current 12V spacing rule has excluded these two capacitors. Re-run the DRC check of the spacing rule, the result is very clean. And C3 and C4 are no longer highlighted.
Example of Using PCB Filter Panel to Generate Query Statements
Everyone has a deep understanding: Let us enter query statements one by one, use its syntax conditions proficiently, and the operation relationship between each condition. For non-code designers, this thing makes you dizzy just thinking about it. Don’t touch it if you can, and try to avoid it if there is a workaround!
Then here is a magic weapon for generating query statements. Through this magic weapon, we can easily organize the required query statements. It is even convenient and intelligent to automatically generate query statements according to the selected object! Without further ado, everything will be clear after reading the case.
To use this magic weapon proficiently, you must have a good relationship with its two major guardians: Find similar objects and PCB filter.
Case reason: In a PCB design, there are several connecting components, and you want them to overlap and be close to each other without reporting errors. Then you need to set the component clearance between these connecting components to allow them to be in close contact at zero distance.
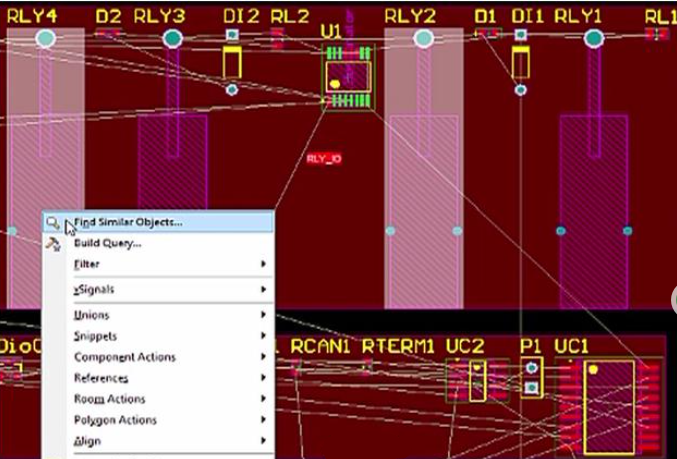
First, create a custom query statement by finding similar objects. That is, select an object, then right-click and select Find similar object.
After the package “Footprint” item, select the same “Same” and make sure the Create expression “Create expression” option box is checked.
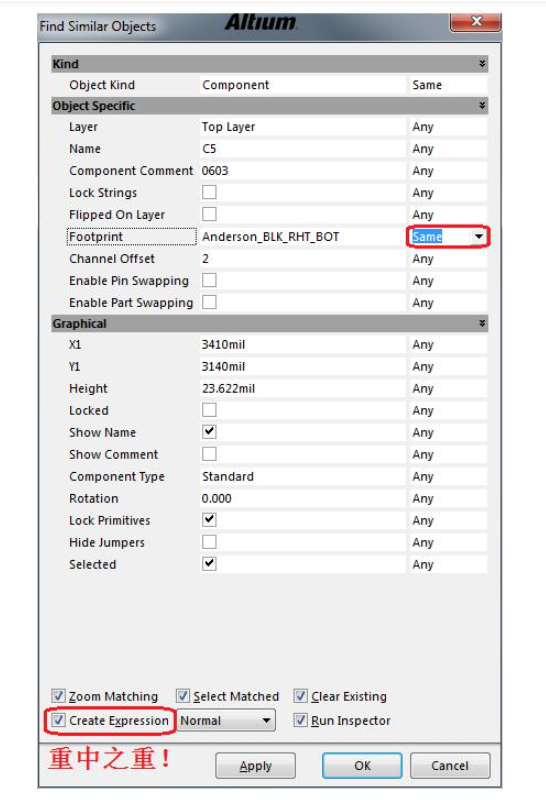
Now click “Apply” to see if all target components that meet the conditions are selected. The result is as you wish.
Then open the PCB filter window “PCB filter”, where you can see the generated statement expression.
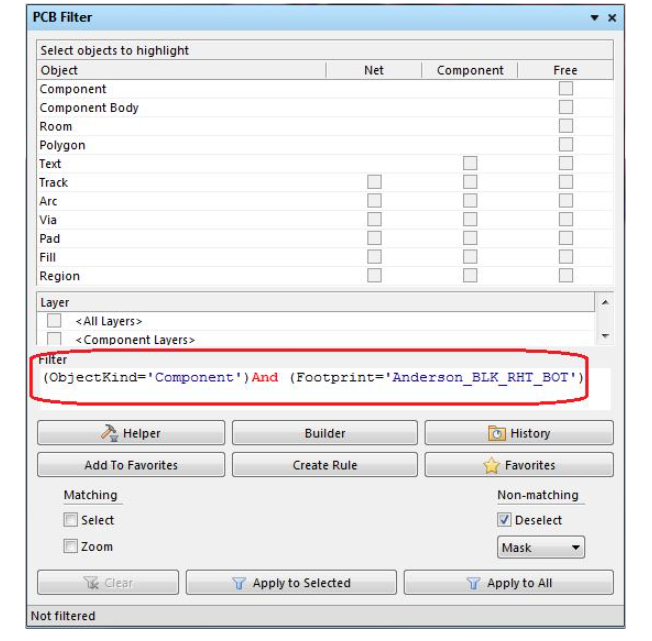
In the filter window, you can copy and paste the expression into the rule setting, or directly click the Create rule “Create rule” button to open the rule setting page. Let’s select the component spacing for the “Anderson” connector. We want to put them together without errors. Click OK to open the rule setting page.
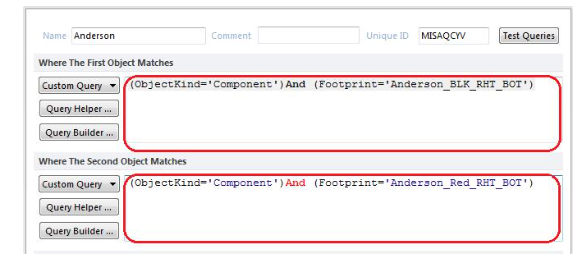
Let’s name this rule “Anderson”. Now in our new rule, the Query statement that matches the first object is automatically imported from the PCB Filter. It represents the black “Black” Anderson connector, and we want the statement that matches the second object to be the red “Red” Anderson connector. Here, we are lazy and directly copy and paste the statement expression from the first object to the statement expression of the second object, and then edit it to change black to red.
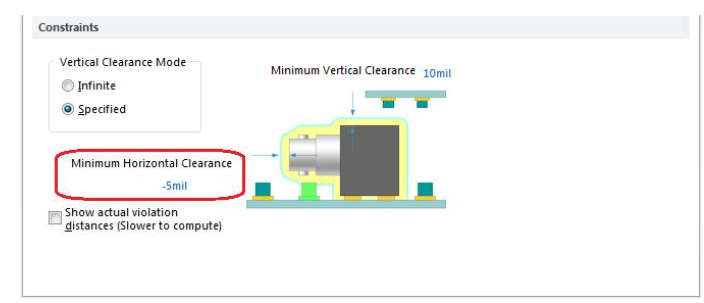
Now we have a rule about the component spacing between black and red connectors. Set the horizontal spacing to -5 mil to allow them to be placed and connected together.
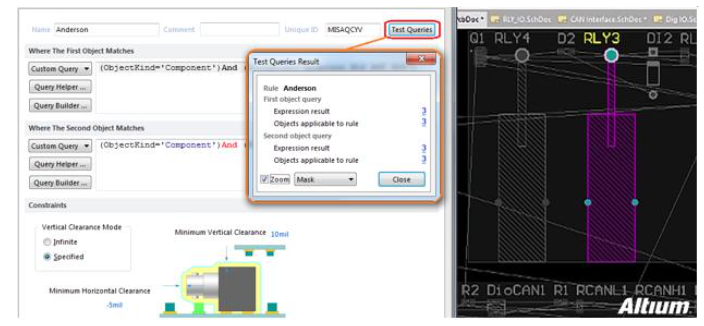
After defining the rule, we now want to see if the scope of the rule just contains the objects we want to cover. To check this, we need to use the test statement “Test queries” function. It will open a test statement result dialog box showing the results of each statement expression. Clicking on each different entry will jump and zoom to those selected objects. Click OK.
Now let’s place a red and black connector next to each other to see if they have spacing errors. No! This is what the rule just now does.
So, use Find Similar Objects to find the object you are interested in, then check Create Expressions to automatically generate a query statement to the PCB Filter panel, and then directly create the rule. So easy! Why bother to check and write a query statement?