Fix flex pcb
Common Issues and Solutions in Fix Flex PCBs
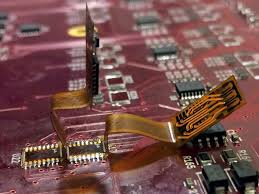
Flex PCBs, or flexible printed circuit boards, are increasingly popular in modern electronics due to their versatility, lightweight nature, and ability to fit into compact spaces. However, like any technology, they are not without their challenges. Understanding common issues and their solutions is crucial for ensuring the reliability and longevity of these components.
One prevalent issue with flex PCBs is delamination, where the layers of the board separate.
This can occur due to excessive bending, thermal stress, or poor manufacturing processes. To address delamination, it is essential to use high-quality materials and ensure proper lamination techniques during production. Additionally, designing the PCB with appropriate bend radii and avoiding sharp bends can mitigate the risk of delamination. Regular inspection and testing during the manufacturing process can also help identify and rectify potential delamination issues before they become problematic.
Another common problem is cracking, which can result from repeated flexing or mechanical stress.
Cracks can lead to open circuits and intermittent connections, compromising the functionality of the device. To prevent cracking, it is advisable to use flexible substrates that can withstand repeated bending. Reinforcing critical areas with additional layers or using protective coatings can also enhance the durability of the flex PCB. Moreover, implementing strain relief features in the design can distribute mechanical stress more evenly, reducing the likelihood of cracks forming.
Solder joint reliability is another critical concern in flex PCBs.
The constant flexing and movement can weaken solder joints, leading to failures. To improve solder joint reliability, it is important to use appropriate soldering techniques and materials. Employing low-temperature soldering processes can minimize thermal stress on the joints. Additionally, using flexible solder masks and ensuring proper alignment during assembly can enhance the overall robustness of the solder joints. Regular inspection and testing of solder joints can help identify potential weaknesses and allow for timely repairs.
Flex PCBs are also susceptible to moisture ingress, which can cause corrosion and electrical shorts.
To combat this issue, it is crucial to use moisture-resistant materials and apply conformal coatings to protect the board from environmental factors. Proper sealing of connectors and ensuring airtight enclosures can further prevent moisture from penetrating the PCB. Additionally, storing flex PCBs in controlled environments with low humidity levels can help maintain their integrity over time.
Electromagnetic interference (EMI) is another challenge that can affect the performance of flex PCBs.
The flexible nature of these boards can make them more susceptible to EMI, leading to signal degradation and noise. To mitigate EMI, it is important to implement proper grounding and shielding techniques in the design. Using low-impedance ground planes and incorporating EMI shielding materials can help minimize interference. Additionally, careful routing of signal traces and maintaining adequate spacing between them can reduce the risk of EMI-related issues.
In conclusion, while flex PCBs offer numerous advantages, they also present unique challenges that require careful consideration and proactive measures. By addressing common issues such as delamination, cracking, solder joint reliability, moisture ingress, and EMI, manufacturers can ensure the reliability and longevity of flex PCBs in various applications. Employing high-quality materials, implementing robust design practices, and conducting thorough testing and inspection are essential steps in overcoming these challenges. As technology continues to advance, ongoing research and development will further enhance the performance and durability of flex PCBs, enabling their widespread adoption in diverse industries.
Step-by-Step Guide to Repairing Damaged Flex PCBs
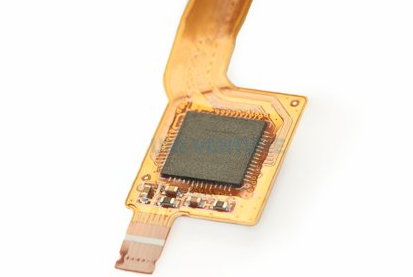
Repairing damaged flexible printed circuit boards (flex PCBs) requires a meticulous approach to ensure the integrity and functionality of the circuit. Flex PCBs are widely used in various electronic devices due to their lightweight, thin, and flexible nature, which allows for innovative designs and compact assemblies. However, their delicate structure also makes them susceptible to damage. This step-by-step guide will walk you through the process of repairing a damaged flex PCB, ensuring that you can restore its functionality with precision and care.
To begin with, it is essential to identify the extent and nature of the damage.
Common issues with flex PCBs include broken traces, delamination, and component failure. A thorough visual inspection under a magnifying glass or microscope can help detect visible cracks, tears, or burnt areas. Additionally, using a multimeter to check for continuity can pinpoint broken traces that are not immediately apparent. Once the damage is identified, the next step is to prepare the necessary tools and materials for the repair.
Gathering the right tools is crucial for a successful repair.
Essential tools include a precision soldering iron, fine-tipped tweezers, a multimeter, a scalpel or precision knife, and a magnifying glass or microscope. Additionally, you will need materials such as solder, flux, Kapton tape, and replacement components if any are damaged. With these tools and materials at hand, you can proceed to the actual repair process.
The first step in repairing a broken trace is to carefully expose the damaged area.
Using a scalpel or precision knife, gently scrape away the protective coating or solder mask to reveal the copper trace beneath. It is important to be gentle during this process to avoid causing further damage to the surrounding areas. Once the copper trace is exposed, clean the area with isopropyl alcohol to remove any debris or oxidation.
Next, apply a small amount of flux to the exposed copper trace.
Flux helps to clean the surface and improve the flow of solder, ensuring a strong and reliable connection. Using a fine-tipped soldering iron, carefully apply solder to the exposed trace, bridging the gap caused by the damage. It is important to use a minimal amount of solder to avoid creating unwanted connections or short circuits. If the trace is severely damaged or missing, you may need to use a thin wire to bridge the gap, soldering it in place to restore continuity.
After repairing the trace, it is crucial to protect the repaired area to prevent future damage.
Applying a small piece of Kapton tape over the repaired trace can provide insulation and mechanical protection. Additionally, if the flex PCB has a solder mask, you can apply a small amount of solder mask repair ink to cover the exposed copper and restore the original protective coating.
In cases where components are damaged, they will need to be carefully desoldered and replaced.
Using a precision soldering iron and fine-tipped tweezers, gently remove the damaged component, taking care not to damage the surrounding traces or pads. Clean the pads with isopropyl alcohol and apply a small amount of flux before soldering the replacement component in place. Ensure that the new component is properly aligned and securely soldered to avoid any connectivity issues.
Finally, after completing the repair, it is essential to test the flex PCB to ensure that it is functioning correctly. Use a multimeter to check for continuity across the repaired traces and verify that all components are properly connected. If possible, test the flex PCB in its intended application to confirm that it operates as expected.
By following these steps with precision and care, you can effectively repair damaged flex PCBs, restoring their functionality and extending the lifespan of your electronic devices.
Essential Tools for Fixing Flex PCBs
When it comes to repairing flexible printed circuit boards (flex PCBs), having the right tools is essential for ensuring a successful and efficient process. Flex PCBs, known for their versatility and ability to conform to various shapes, are widely used in modern electronics. However, their delicate nature requires specialized tools and techniques to address any issues that may arise. Understanding the essential tools for fixing flex PCBs can significantly enhance the repair process and improve the longevity of the circuits.
First and foremost, a high-quality soldering iron is indispensable.
Given the intricate and sensitive nature of flex PCBs, a soldering iron with adjustable temperature control is crucial. This allows for precise temperature settings, which are necessary to avoid damaging the thin and flexible substrate. Additionally, a fine-tipped soldering iron is recommended to handle the small and densely packed components typically found on flex PCBs. Coupled with this, using lead-free solder can help ensure a more environmentally friendly repair process while maintaining strong and reliable connections.
In conjunction with a soldering iron, a good pair of tweezers is essential for handling small components.
Precision tweezers with fine tips allow for accurate placement and removal of components without causing damage to the flex PCB. Furthermore, anti-static tweezers are advisable to prevent any electrostatic discharge that could potentially harm sensitive electronic components.
Another critical tool is a magnification device, such as a microscope or a magnifying lamp.
The small size and high density of components on flex PCBs make it challenging to perform repairs with the naked eye. Magnification devices provide a clear and enlarged view of the work area, enabling more precise and accurate repairs. This is particularly important when dealing with micro soldering tasks or inspecting for minute defects and damages.
Moreover, a hot air rework station is highly beneficial for repairing flex PCBs.
This tool allows for the controlled application of heat to reflow solder joints, making it easier to remove and replace components without applying direct heat from a soldering iron. The adjustable airflow and temperature settings of a hot air rework station provide greater control and reduce the risk of damaging the flex PCB or its components.
In addition to these tools, having a reliable multimeter is crucial for diagnosing issues on flex PCBs. A multimeter can measure voltage, current, and resistance, helping to identify faulty components or broken traces. This diagnostic capability is essential for pinpointing the exact location of a problem, thereby facilitating a more targeted and effective repair.
Furthermore, a set of precision cutting tools, such as a hobby knife or micro scissors, is necessary for trimming and shaping the flex PCB material. These tools allow for clean and accurate cuts, which are often required when modifying or repairing the flexible substrate. Ensuring that the edges are smooth and free of burrs is important to prevent any potential short circuits or mechanical failures.
Lastly, it is important to have a clean and organized workspace.
A clutter-free environment reduces the risk of accidental damage to the flex PCB and its components. Additionally, using an anti-static mat and wrist strap can help protect against electrostatic discharge, which can be detrimental to sensitive electronic parts.
In conclusion, repairing flex PCBs requires a combination of specialized tools and careful techniques. A high-quality soldering iron, precision tweezers, magnification devices, a hot air rework station, a reliable multimeter, precision cutting tools, and a clean workspace are all essential for successful repairs. By equipping oneself with these tools and adhering to best practices, one can effectively address issues with flex PCBs and ensure their optimal performance and longevity.

Preventative Maintenance Tips for Flex PCBs
Preventative maintenance is crucial for ensuring the longevity and reliability of flexible printed circuit boards (flex PCBs). These versatile components are integral to a wide range of modern electronic devices, from smartphones to medical equipment. By implementing a series of preventative measures, one can significantly reduce the risk of failure and extend the operational life of flex PCBs.
To begin with, it is essential to handle flex PCBs with care during both the assembly and installation processes.
Flex PCBs are inherently more delicate than their rigid counterparts due to their thin and flexible nature. Therefore, it is advisable to use tools specifically designed for handling these components, such as tweezers with smooth tips and anti-static gloves. This minimizes the risk of physical damage and electrostatic discharge, which can compromise the integrity of the circuits.
Moreover, proper storage conditions play a pivotal role in maintaining the quality of flex PCBs.
These components should be stored in a clean, dry environment to prevent contamination and moisture absorption. Utilizing anti-static bags and desiccant packs can further protect the PCBs from environmental factors that may lead to corrosion or short circuits. Regularly inspecting the storage area for signs of humidity or dust accumulation can help in maintaining an optimal environment for these sensitive components.
In addition to careful handling and storage, regular inspection and testing are fundamental aspects of preventative maintenance for flex PCBs.
Periodic visual inspections can help identify early signs of wear and tear, such as cracks, delamination, or discoloration. Employing advanced diagnostic tools, such as X-ray inspection systems and automated optical inspection (AOI) machines, can provide a more comprehensive assessment of the PCB’s condition. These tools can detect hidden defects that may not be visible to the naked eye, allowing for timely intervention before the issues escalate.
Furthermore, it is important to consider the operating conditions under which the flex PCBs will be used.
Excessive heat, vibration, and mechanical stress can all contribute to the degradation of these components. Implementing proper thermal management solutions, such as heat sinks and thermal interface materials, can help dissipate heat and prevent overheating. Additionally, designing the PCB layout to minimize stress points and incorporating strain relief features can mitigate the impact of mechanical forces.
Another critical aspect of preventative maintenance is ensuring that the flex PCBs are compatible with the materials and components they will interact with.
Incompatible materials can lead to chemical reactions that degrade the PCB over time. For instance, using adhesives or encapsulants that are not specifically designed for flex PCBs can result in delamination or other forms of damage. Therefore, it is essential to select materials that are chemically compatible and have been tested for use with flex PCBs.
Lastly, maintaining thorough documentation and records of all maintenance activities can greatly enhance the effectiveness of a preventative maintenance program. Keeping detailed logs of inspections, tests, and any repairs or modifications performed on the flex PCBs allows for better tracking of their condition over time. This information can be invaluable in identifying recurring issues and implementing more targeted maintenance strategies.
In conclusion, preventative maintenance for flex PCBs involves a combination of careful handling, proper storage, regular inspection, and consideration of operating conditions. By adhering to these practices, one can significantly enhance the durability and performance of flex PCBs, ensuring their reliable operation in various applications.