The Comprehensive Guide to Checking Circuit Boards
Introduction
Circuit boards are the backbone of modern electronics, found in everything from smartphones to industrial machinery. Ensuring their functionality and reliability is crucial, as even minor defects can lead to system failures. Checking circuit boards involves a series of inspections and tests to identify issues such as short circuits, open connections, faulty components, and manufacturing defects. This guide explores various methods for checking circuit boards, including visual inspection, automated testing, and advanced diagnostic techniques.
1. Visual Inspection
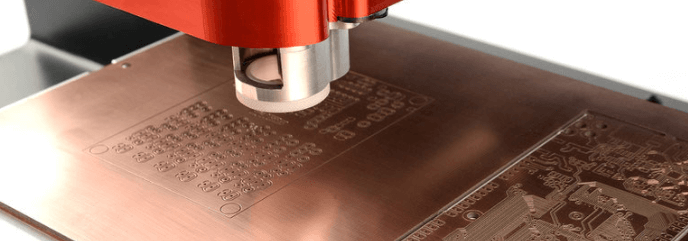
The first step in checking a circuit board is a thorough visual inspection. Many defects can be identified with the naked eye or under magnification.
1.1 Tools for Visual Inspection
- Magnifying Glass or Microscope: Helps detect tiny cracks, solder bridges, or misaligned components.
- Bright Lighting: Ensures clear visibility of solder joints and traces.
- Digital Camera or Microscope with Imaging: Useful for documenting defects.
1.2 Common Visual Defects
- Solder Bridges: Unintended connections between adjacent pads or traces.
- Cold Solder Joints: Dull or cracked solder connections that may cause intermittent failures.
- Component Misalignment: Improperly placed resistors, capacitors, or ICs.
- Burn Marks or Discoloration: Indicates overheating or electrical faults.
- Damaged Traces: Broken or corroded copper pathways.
1.3 Best Practices
- Inspect both sides of the PCB.
- Compare the board with a known-good sample (if available).
- Use proper lighting to avoid missing fine details.
2. Manual Testing with Multimeters
A digital multimeter (DMM) is essential for checking continuity, resistance, and voltage levels.
2.1 Continuity Testing
- Used to detect open circuits (broken traces) or short circuits (unwanted connections).
- Set the multimeter to continuity mode (beep mode).
- Probe across traces or component leads to check for connectivity.
2.2 Resistance Measurement
- Helps identify faulty resistors or high-resistance solder joints.
- Compare measured values with expected resistor ratings.
2.3 Voltage Testing
- Verifies power supply levels at different points.
- Ensures ICs receive correct input voltages.
2.4 Limitations
- Time-consuming for complex boards.
- Cannot detect all types of faults (e.g., intermittent issues).
3. Automated Testing Methods
For large-scale production or complex PCBs, automated testing improves efficiency and accuracy.
3.1 In-Circuit Testing (ICT)
- Uses a bed-of-nails fixture to make contact with test points.
- Checks individual components (resistors, capacitors, diodes) for correct values.
- Detects shorts, opens, and incorrect component placements.
3.2 Flying Probe Testing
- A needle-based system that moves across the board to test points.
- Flexible and suitable for low-volume production.
- No custom fixture required.
3.3 Functional Testing (FCT)
- Powers up the PCB and tests its operation under real-world conditions.
- Verifies inputs, outputs, and communication protocols (e.g., UART, I2C, SPI).
3.4 Boundary Scan Testing (JTAG)
- Tests digital ICs using the JTAG interface.
- Useful for diagnosing faults in complex, high-density boards.

4. Advanced Diagnostic Techniques
For deeper analysis, specialized tools and techniques are used.
4.1 Thermal Imaging
- Infrared cameras detect overheating components.
- Helps identify short circuits or failing ICs.
4.2 X-Ray Inspection
- Reveals hidden defects like:
- Voiding in solder joints (BGA packages).
- Internal trace damage (multilayer PCBs).
4.3 Oscilloscope Analysis
- Captures signal waveforms to diagnose timing issues or noise.
- Essential for debugging high-speed digital or analog circuits.
4.4 Automated Optical Inspection (AOI)
- Uses cameras and AI to detect assembly defects.
- Common in SMT (Surface Mount Technology) production lines.
5. Common PCB Faults and Solutions
| Fault Type | Symptoms | Diagnosis Method | Solution |
|---|---|---|---|
| Short Circuit | Overheating, no power | Continuity test, thermal imaging | Locate and repair shorted trace |
| Open Circuit | Non-functional component | Continuity test | Re-solder or replace trace |
| Cold Solder Joint | Intermittent connection | Visual inspection | Reflow solder |
| Component Failure | Incorrect readings | Multimeter, oscilloscope | Replace faulty component |
| EMI/RFI Noise | Signal distortion | Oscilloscope, spectrum analyzer | Improve grounding/shielding |
6. Best Practices for PCB Testing
- Start with Visual Inspection – Many defects are visible.
- Use a Multimeter for Basic Checks – Verify power and continuity.
- Apply Automated Testing for Complex Boards – ICT or flying probe for efficiency.
- Leverage Advanced Tools When Needed – Thermal imaging, X-ray, or oscilloscopes for hidden issues.
- Document Findings – Helps in debugging and future improvements.
- Test in Stages – Power-up tests only after confirming no shorts.
7. Conclusion
Checking circuit boards is a multi-step process that combines visual inspection, manual testing, and automated diagnostics. While simple boards can be verified with a multimeter and careful observation, complex designs require advanced tools like ICT, JTAG, or X-ray inspection. By following systematic testing procedures, engineers can ensure PCB reliability, reduce failure rates, and improve product quality. Whether in prototyping, manufacturing, or repair, a structured approach to PCB testing is essential for success in electronics development.
.