How to Solve Impedance Discontinuity in PCB Design
Introduction
Impedance discontinuity in printed circuit board (PCB) design is one of the most challenging issues facing high-speed digital and RF circuit designers today. As signal frequencies continue to increase and rise times become faster, maintaining consistent impedance throughout the signal path has become critical for ensuring signal integrity. Impedance mismatches can lead to signal reflections, ringing, overshoot, undershoot, and other signal integrity problems that degrade system performance.
This article explores the root causes of impedance discontinuity in PCB designs and provides comprehensive solutions to minimize or eliminate these issues. We will examine techniques ranging from proper stackup design to careful routing strategies and termination methods.
Understanding Impedance Discontinuity
What is Impedance Discontinuity?
Impedance discontinuity occurs when there is an abrupt change in the characteristic impedance along a transmission line. In PCB design, the characteristic impedance of a trace is determined by its geometry (width and thickness) and its relationship to reference planes (spacing to ground/power planes), as well as the dielectric properties of the PCB material.
When a signal encounters an impedance mismatch, a portion of the signal reflects back toward the source while the remainder continues forward. These reflections can cause various signal integrity issues, especially in high-speed designs where signal rise times are very fast.
Common Causes of Impedance Discontinuity
Several factors in PCB design can lead to impedance discontinuities:
- Layer transitions: When signals transition between layers through vias
- Changes in trace width: Due to routing constraints or connection requirements
- Connectors and packages: Interfaces between PCBs and components
- Branching traces: T-junctions or stubs in routing
- Changes in reference planes: Gaps in power or ground planes beneath traces
- Bends and corners: Sharp angles in trace routing
- Dielectric material variations: Inconsistent dielectric constant across the board
Solutions for Minimizing Impedance Discontinuity
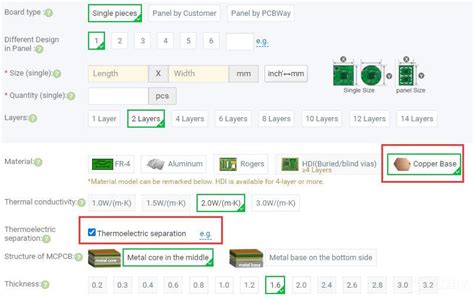
1. Proper Stackup Design
The foundation for good impedance control begins with proper PCB stackup design:
- Use symmetrical stackups: This helps prevent warpage and maintains consistent impedance
- Maintain consistent dielectric thickness: Between signal layers and their reference planes
- Choose appropriate materials: With stable dielectric constants (Dk) across frequency
- Specify controlled impedance requirements: Clearly in your fabrication notes
A well-designed stackup provides the baseline for predictable impedance throughout the board.
2. Controlled Impedance Routing
Once the stackup is defined, implement these routing practices:
- Maintain consistent trace width: For a given impedance requirement
- Use calculator or field solver: To determine proper trace dimensions
- Account for manufacturing tolerances: Include ±10% variations in your calculations
- Avoid unnecessary width changes: Keep impedance-critical traces uniform
For differential pairs, pay special attention to maintaining consistent spacing between the pair members.
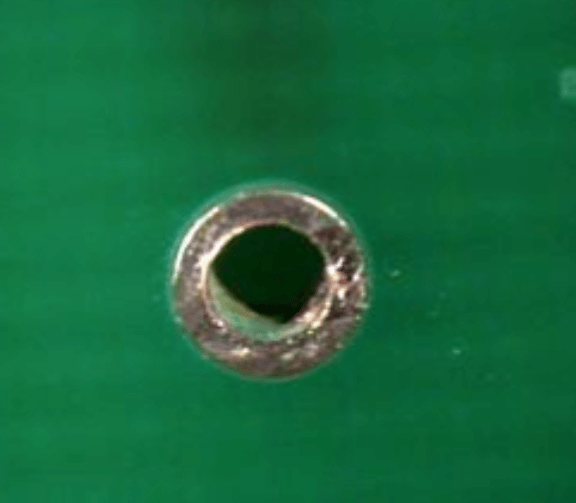
3. Via Optimization
Vias are one of the most common sources of impedance discontinuity. Mitigate their impact by:
- Using smaller vias: When possible, to minimize stub length
- Implementing back-drilling: To remove unused via portions
- Adding ground vias: Near signal vias to provide return path continuity
- Using via-in-pad techniques: For high-density designs
- Considering coaxial via structures: For critical RF signals
For high-speed designs, simulate via structures to understand their impedance impact.
4. Proper Corner Routing
Avoid sharp 90° angles in high-speed traces, which can cause impedance variations:
- Use 45° angles: Or curved traces for direction changes
- Maintain constant width: Through the bend
- Consider mitred corners: For very high-frequency signals
The key is to make any direction changes as gradual as possible given routing constraints.
5. Reference Plane Management
Ensure uninterrupted reference planes beneath impedance-controlled traces:
- Avoid splits or gaps: In reference planes under critical traces
- Maintain return path continuity: Especially at layer transitions
- Use stitching capacitors: When crossing plane divides is unavoidable
- Keep adequate clearance: From plane edges and anti-pads
For high-speed designs, a solid reference plane is often more important than the trace itself.
6. Connector and Package Considerations
Address discontinuities at component interfaces:
- Select connectors carefully: With impedance matching in mind
- Use package-aware design: Account for package parasitics in simulations
- Implement proper breakout patterns: From BGAs and other fine-pitch devices
- Consider interposer solutions: For critical interfaces
The goal is to minimize the impedance variation between the PCB and components.
7. Termination Techniques
Proper termination can help mitigate the effects of unavoidable discontinuities:
- Series termination: At drivers to reduce reflections
- Parallel termination: At receivers for impedance matching
- AC termination: For specific frequency ranges
- Differential termination: For differential signaling
Choose termination strategies based on your specific signaling standards and requirements.
8. Simulation and Verification
Validate your design through:
- 3D electromagnetic simulation: Of critical structures
- Time-domain reflectometry (TDR) analysis: To identify discontinuities
- Manufacturing tolerance analysis: To ensure robustness
- Prototype measurement: To verify real-world performance
Simulation helps identify potential problems before fabrication, saving time and cost.
Advanced Techniques
For extremely high-performance designs, consider these advanced methods:
- Embedded planar capacitors: For improved power delivery and reference plane continuity
- Tapered transitions: Between different impedance sections
- Custom via structures: With controlled impedance characteristics
- Alternative materials: Such as low-loss laminates for critical RF sections
- Active impedance compensation: Circuits that adapt to impedance variations
Manufacturing Considerations
Work closely with your PCB fabricator to:
- Communicate impedance requirements clearly
- Understand their capabilities and tolerances
- Request impedance testing on production boards
- Review test results and adjust designs if needed
A good relationship with your fabricator is essential for achieving consistent impedance control.
Conclusion
Impedance discontinuity in PCB design is a complex challenge that requires attention throughout the design process—from initial stackup planning to final manufacturing verification. By implementing the techniques discussed in this article—proper stackup design, controlled routing, via optimization, reference plane management, and appropriate termination—designers can significantly reduce impedance variations and their associated signal integrity problems.
The key to success lies in a systematic approach that considers impedance control at every stage of design and validates assumptions through simulation and measurement. As signal speeds continue to increase, mastering these techniques will become even more critical for successful PCB design.
Remember that every design represents a set of trade-offs, and the art of PCB design involves balancing impedance control with other requirements such as density, cost, and manufacturability. With careful planning and execution, however, impedance discontinuities can be effectively managed to ensure robust, high-performance electronic systems.