Pcb making kit
Top 5 PCB Making Kits for Beginners
Printed Circuit Boards (PCBs) are the backbone of modern electronic devices, providing a platform for mounting and interconnecting electronic components. For beginners eager to delve into the world of electronics, a PCB making kit can be an invaluable tool. These kits typically include all the necessary materials and instructions to create your own PCBs, making the learning process both accessible and engaging. In this article, we will explore the top five PCB making kits for beginners, each offering unique features and benefits to help you get started on your electronic projects.
Firstly, the Elenco Circuit Board Kit is a popular choice among novices.
Known for its comprehensive instruction manual, this kit guides users through the entire PCB creation process, from designing the circuit to etching and soldering. The Elenco kit includes a variety of components such as copper-clad boards, etching solution, and a drill for making precise holes. Its step-by-step approach ensures that even those with no prior experience can successfully create functional PCBs. Additionally, the kit’s affordability makes it an attractive option for students and hobbyists alike.
Transitioning to another excellent option, the Velleman EDU03 Educational Kit stands out for its educational focus.
This kit is designed specifically for beginners and includes a detailed guide that explains the principles of PCB design and manufacturing. The Velleman kit comes with pre-sensitized boards, a UV exposure unit, and all necessary chemicals for developing and etching the board. The inclusion of a UV exposure unit is particularly noteworthy, as it allows for more precise and professional-looking PCBs. Furthermore, the educational materials provided with the kit make it an excellent resource for those looking to deepen their understanding of electronics.
Next, the MG Chemicals 416-K PCB Prototyping Kit offers a more advanced experience for beginners ready to take on a challenge.
This kit includes high-quality materials such as positive presensitized boards, developer, and etching solution. What sets the MG Chemicals kit apart is its focus on producing professional-grade PCBs. The kit’s detailed instructions cover advanced techniques such as double-sided PCB creation and through-hole plating. While it may be slightly more complex than other beginner kits, it provides a valuable learning experience for those looking to advance their skills.
Another noteworthy kit is the Jameco ValuePro PCB Etching Kit, which is ideal for those on a budget.
This kit includes all the basic materials needed to create a PCB, such as copper-clad boards, etching solution, and a resist pen. The Jameco kit is particularly user-friendly, with straightforward instructions that make it easy for beginners to follow along. Despite its simplicity, the kit does not compromise on quality, ensuring that users can produce reliable and functional PCBs. Its affordability and ease of use make it a great starting point for anyone new to PCB making.
Lastly, the SparkFun Beginner’s Tool Kit for PCB Design is a comprehensive package that goes beyond just PCB creation.
In addition to the materials needed for making PCBs, this kit includes essential tools such as a soldering iron, multimeter, and wire cutters. The SparkFun kit is designed to provide beginners with everything they need to start working on electronic projects immediately. The included guide covers both PCB creation and basic electronics principles, making it a well-rounded option for those looking to build a solid foundation in electronics.
In conclusion, each of these PCB making kits offers unique features and benefits tailored to beginners. Whether you are looking for a comprehensive educational experience, professional-grade materials, or a budget-friendly option, there is a kit to suit your needs. By choosing the right PCB making kit, you can embark on your journey into the fascinating world of electronics with confidence and enthusiasm.
Step-by-Step Guide to Using a PCB Making Kit
Printed Circuit Boards (PCBs) are the backbone of modern electronic devices, providing a platform for mounting and interconnecting various electronic components. For hobbyists and professionals alike, a PCB making kit offers a convenient and efficient way to create custom PCBs. This step-by-step guide will walk you through the process of using a PCB making kit, ensuring that you achieve optimal results.
To begin with, it is essential to gather all the necessary materials and tools included in your PCB making kit.
Typically, a kit will contain a blank copper-clad board, etching solution, a resist pen or film, and various other accessories. Additionally, you will need a few common tools such as a drill, a pair of tweezers, and safety equipment like gloves and goggles.
The first step in the process is designing your PCB layout.
This can be done using specialized software such as Eagle, KiCad, or Altium Designer. These programs allow you to create a schematic diagram and then convert it into a PCB layout. Once your design is complete, print it onto a transparent sheet using a laser printer. It is crucial to ensure that the printout is accurate and free of any smudges or errors, as this will directly impact the quality of your final PCB.
Next, prepare the copper-clad board by cleaning it thoroughly with a fine abrasive pad or steel wool.
This step removes any oxidation and ensures that the resist adheres properly to the copper surface. After cleaning, rinse the board with water and dry it completely.
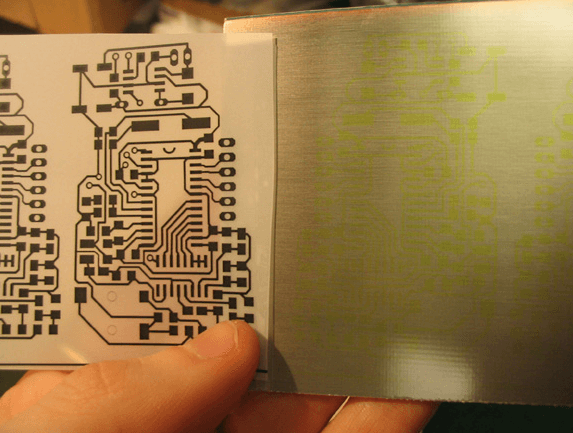
Now, transfer your design onto the copper-clad board.
If you are using a resist pen, carefully trace the design onto the board. Alternatively, if your kit includes a resist film, place the transparent sheet with your design onto the board and expose it to UV light as per the manufacturer’s instructions. The UV exposure hardens the resist in the areas where the design is printed, creating a protective barrier against the etching solution.
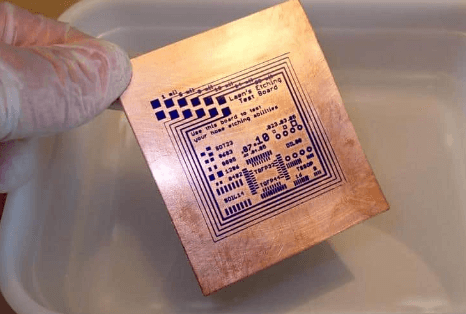
Once the resist is applied, it is time to etch the board.
Pour the etching solution into a plastic container and submerge the board. Gently agitate the container to ensure even exposure to the solution. The etching process will dissolve the unprotected copper, leaving only the copper traces covered by the resist. This step requires careful monitoring, as over-etching can damage the board. When the unwanted copper is completely removed, rinse the board with water to stop the etching process.
After etching, remove the resist by using a solvent such as acetone.
This will reveal the copper traces that form the circuit. Inspect the board for any defects or incomplete traces and make necessary corrections using a conductive pen or by soldering small wires.
The final step involves drilling holes for component leads.
Use a precision drill to create holes at the designated points on your PCB layout. Ensure that the holes are clean and properly aligned with the traces.
With the holes drilled, your PCB is now ready for component placement and soldering. Carefully insert the components into their respective positions and solder them in place, ensuring strong and reliable connections.
In conclusion, using a PCB making kit involves a series of meticulous steps, from designing the layout to etching and drilling. By following this guide, you can create high-quality custom PCBs for your electronic projects, enhancing both their functionality and reliability.
Essential Tools Included in a PCB Making Kit
A PCB making kit is an invaluable resource for both novice and experienced electronics enthusiasts, providing all the essential tools required to design and fabricate printed circuit boards (PCBs). These kits are meticulously curated to ensure that users have everything they need to create functional and reliable PCBs, from the initial design phase to the final assembly. Understanding the essential tools included in a PCB making kit can significantly enhance the efficiency and quality of your PCB projects.
To begin with, one of the most fundamental components of a PCB making kit is the copper-clad board.
This board serves as the substrate upon which the circuit is built. Typically made of fiberglass or other insulating materials, the copper-clad board is coated with a thin layer of copper on one or both sides. This copper layer is where the circuit traces will be etched, forming the electrical pathways that connect various components. The quality and type of copper-clad board can vary, but most kits include a standard FR4 board, which is known for its durability and reliability.
In addition to the copper-clad board, a PCB making kit usually includes a set of etching chemicals.
These chemicals are crucial for the process of removing unwanted copper from the board, leaving behind only the desired circuit traces. Ferric chloride is a common etchant included in many kits due to its effectiveness and ease of use. However, some kits may offer alternative etching solutions such as ammonium persulfate or cupric chloride, each with its own set of advantages and handling requirements.
Another indispensable tool in a PCB making kit is the photoresist material.
This material is applied to the copper-clad board to create a protective layer that defines the circuit pattern. Photoresist can be either positive or negative, depending on the type of exposure process used. Positive photoresist becomes soluble when exposed to light, allowing the exposed areas to be etched away, while negative photoresist hardens upon exposure, protecting the underlying copper. The choice of photoresist can impact the precision and resolution of the final PCB.
Furthermore, a PCB making kit often includes a UV exposure unit or a lightbox.
This device is used to transfer the circuit design onto the photoresist-coated board. By placing a transparent film with the circuit pattern over the board and exposing it to UV light, the photoresist is selectively hardened or dissolved, depending on its type. The accuracy of this exposure process is critical for achieving a high-quality PCB, making the UV exposure unit an essential tool in the kit.
Additionally, a PCB making kit typically comes with a set of drilling tools.
These tools are used to create holes in the PCB for mounting electronic components. Precision is key when drilling these holes, as they must align perfectly with the circuit traces to ensure proper electrical connections. Many kits include a handheld drill or a small drill press, along with a variety of drill bits to accommodate different hole sizes.
Finally, a comprehensive PCB making kit will also include various ancillary tools such as tweezers, soldering equipment, and cleaning supplies.
Tweezers are essential for handling small components and placing them accurately on the board. Soldering equipment, including a soldering iron and solder wire, is necessary for attaching components to the PCB. Cleaning supplies, such as isopropyl alcohol and brushes, are used to remove any residual chemicals and ensure a clean, functional board.
In conclusion, a PCB making kit is a well-rounded collection of tools designed to facilitate the entire PCB fabrication process. From the copper-clad board and etching chemicals to the photoresist material and UV exposure unit, each component plays a vital role in creating high-quality printed circuit boards. By understanding the purpose and function of these essential tools, users can maximize the potential of their PCB making kits and achieve professional-grade results in their electronic projects.

How to Choose the Right PCB Making Kit for Your Project
When embarking on a project that requires the creation of a printed circuit board (PCB), selecting the right PCB making kit is crucial to ensure both the efficiency and success of your endeavor. The market offers a plethora of options, each with its own set of features and capabilities, making the decision-making process somewhat daunting. However, by considering a few key factors, you can streamline your selection and choose a kit that best suits your project’s needs.
First and foremost, it is essential to evaluate the complexity of your project.
If you are working on a simple design with minimal components, a basic PCB making kit may suffice. These kits typically include essential items such as copper-clad boards, etching solution, and basic tools for drilling and cutting. On the other hand, more complex projects that involve multiple layers or intricate designs may require advanced kits that offer additional features like photoresist materials, UV exposure units, and precision drilling equipment. Understanding the scope of your project will help you determine the level of sophistication needed in your PCB making kit.
Another critical factor to consider is the quality of the materials included in the kit.
High-quality materials not only ensure the durability and reliability of your PCB but also contribute to the overall ease of the manufacturing process. For instance, copper-clad boards with a uniform thickness and high copper purity will provide better conductivity and reduce the risk of defects. Similarly, using a high-quality etching solution can result in cleaner and more precise traces. Therefore, it is advisable to research and select kits that are known for their superior material quality.
In addition to material quality, the comprehensiveness of the kit is another aspect that warrants attention.
A well-rounded PCB making kit should include all the necessary tools and components required for the entire PCB fabrication process. This includes items such as a PCB layout software, which allows you to design and visualize your circuit before actual production. Some kits also come with instructional guides or access to online tutorials, which can be particularly beneficial for beginners. Ensuring that the kit is comprehensive will save you time and effort in sourcing additional tools and materials separately.
Furthermore, the compatibility of the kit with your existing equipment and software is an important consideration.
If you already have certain tools or software that you prefer to use, it is essential to ensure that the new kit will integrate seamlessly with them. For example, if you use a specific type of soldering iron or a particular PCB design software, check that the kit’s components are compatible with these. This will prevent any potential issues during the fabrication process and allow for a smoother workflow.
Lastly, budget constraints often play a significant role in the decision-making process.
While it may be tempting to opt for the most affordable option, it is important to strike a balance between cost and quality. Investing in a slightly more expensive kit that offers better materials and comprehensive tools can ultimately save you money by reducing the likelihood of errors and rework. Therefore, it is prudent to set a realistic budget and choose a kit that offers the best value for your investment.
In conclusion, selecting the right PCB making kit involves careful consideration of the project’s complexity, material quality, comprehensiveness, compatibility, and budget. By taking these factors into account, you can make an informed decision that will enhance the efficiency and success of your PCB fabrication process.


