Peak current and decoupling capacitors during PCB layout
The main reason for the peak current is:
The T3 and T4 tubes of the output stage are turned on at the same time in the short design. In the process of the NAND gate switching from low output level to high output level, the negative jump of the input voltage generates a large reverse drive current in the base loop of T2 and T3. Since the saturation depth of T3 is designed to be larger than that of T2, the reverse drive current will cause T2 to be out of saturation first and cut off.
After T2 is cut off, its collector potential rises, causing T4 to turn on.
However, T3 has not yet left saturation at this time, so T3 and T4 will be turned on at the same time in a very short design, thereby generating a large ic4, causing the power supply current to form a spike current. R4 in the figure is designed to limit this spike current.
R4 in the low-power TTL gate circuit is large, so its spike current is small. When the input voltage changes from low level to high level, the output level of the NAND gate changes from high to low, and T3 and T4 may also be turned on at the same time. However, when T3 begins to turn on, T4 is in the amplification state, and the collector-emitter voltage of the two tubes is large, so the generated spike current is small, and the impact on the power supply current is relatively small.

Another reason for the generation of spike current is the influence of load capacitance.
There is actually a load capacitor CL at the output of the NAND gate. When the output of the gate switches from low to high, the power supply voltage charges the capacitor CL through T4, thus forming a spike current.
When the output of the NAND gate switches from high level to low level, the capacitor CL discharges through T3
. At this time, the discharge current does not pass through the power supply, so the discharge current of CL has no effect on the power supply current.
Methods for suppressing spike current:
- Take measures on the wiring of the circuit board to minimize the stray capacitance of the signal line;
- Another method is to try to reduce the internal resistance of the power supply so that the spike current does not cause excessive power supply voltage fluctuations;
- The usual practice is to use decoupling capacitors for filtering. Generally, a 1uF~10uF decoupling capacitor is placed at the power inlet of the circuit board to filter out low-frequency noise; a 0.01uF~0.1uF decoupling capacitor (high-frequency filter capacitor) is placed between the power supply and ground of each active device in the circuit board to filter out high-frequency noise. The purpose of filtering is to filter out the AC interference superimposed on the power supply, but the larger the capacitance used, the better, because the actual capacitor is not an ideal capacitor and does not have all the characteristics of an ideal capacitor.
The selection of decoupling capacitors can be calculated according to C=1/F, where F is the circuit frequency, that is, 0.1uF for 10MHz and 0.01uF for 100MHz. Generally, 0.1~0.01uF can be used.
The high-frequency filter capacitor placed next to the active device has two functions.
One is to filter out the high-frequency interference transmitted along the power supply, and the other is to timely supplement the peak current required when the device works at high speed. Therefore, the placement of the capacitor needs to be considered.
Due to the existence of parasitic parameters, the actual capacitor can be equivalent to the resistance and inductance connected in series with the capacitor, which are called equivalent series resistance (ESR) and equivalent series inductance (ESL). In this way, the actual capacitor is a series resonant circuit with a resonant frequency of:
The actual capacitor is capacitive at frequencies below Fr and inductive at frequencies above Fr, so the capacitor is more like a band-stop filter.
10uF electrolytic capacitors have a large ESL and Fr is less than 1MHz. They have a good filtering effect on low-frequency noise such as 50Hz, but have little effect on high-frequency switching noise of hundreds of megahertz.
The ESR and ESL of a capacitor are determined by the structure of the capacitor and the medium used, not the capacitance.
The ability to suppress high-frequency interference cannot be improved by using a larger capacitor. For the same type of capacitor, the impedance of a large capacitor is smaller than that of a small capacitor at a frequency lower than Fr, but if the frequency is higher than Fr, ESL determines that there will be no difference in the impedance of the two.
Using too many large-capacity capacitors on a circuit board does not help to filter out high-frequency interference, especially when powered by a high-frequency switching power supply. Another problem is that too many large-capacity capacitors increase the impact on the power supply when powering on and hot-swapping the circuit board, which can easily cause problems such as power supply voltage drop, circuit board connector sparking, and slow voltage rise in the circuit board.
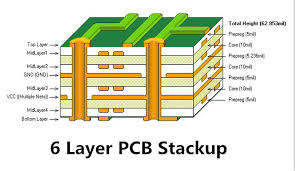
Placement of decoupling capacitors during PCB layout:
For the installation of capacitors, the first thing to mention is the installation distance.
The capacitor with the smallest capacitance has the highest resonant frequency and the smallest decoupling radius, so it is placed closest to the chip. Those with slightly larger capacitance can be placed a little further away, with the largest capacitance placed on the outermost layer.

However, all capacitors for decoupling the chip should be as close to the chip as possible.
Another point to note is that when placing, it is best to evenly distribute them around the chip, and this is the case for each capacitance level. Usually, the arrangement of the power and ground pins is taken into account when designing the chip, and they are generally evenly distributed on the four sides of the chip. Therefore, voltage disturbances exist around the chip, and decoupling must also be evenly decoupled for the entire chip area. If the 680pF capacitors in the above figure are all placed on the upper part of the chip, due to the decoupling radius problem, the voltage disturbances on the lower part of the chip cannot be well decoupled.
Capacitor installation:
When installing the capacitor, pull a small lead from the pad, and then connect it to the power plane through the via, and the same is true for the ground terminal. The current loop flowing through the capacitor is: power plane -> via -> lead -> pad -> capacitor -> pad -> lead -> via -> ground plane. Figure 2 shows the return path of the current intuitively.
The first method is to lead a long lead from the pad and then connect the via, which will introduce a large parasitic inductance. Be sure to avoid doing this. This is the worst installation method.
The second method is to punch holes at the two ends of the pad close to the pad. The circuit area is much smaller than the first method, and the parasitic inductance is also smaller, which is acceptable.
The third method is to punch holes on the side of the pad, which further reduces the loop area.
The parasitic inductance is smaller than the second method, which is a better method.
The fourth method is to punch holes on both sides of the pad. Compared with the third method, it is equivalent to connecting each end of the capacitor to the power plane and the ground plane in parallel through the via. The parasitic inductance is smaller than the third method. As long as the space allows, try to use this method. The last method is to punch holes directly on the pad, which has the smallest parasitic inductance, but there may be problems with welding. Whether to use it depends on the processing capacity and method.
One point needs to be emphasized: Some engineers sometimes use common vias for multiple capacitors to save space.
Do not do this under any circumstances. It is best to find a way to optimize the design of the capacitor combination and reduce the number of capacitors.
Since the wider the printed line, the smaller the inductance, the lead from the pad to the via should be widened as much as possible, and if possible, try to make it the same width as the pad. In this way, even for capacitors in 0402 packages, you can use 20mil wide lead wires. The lead wire and via installation are shown in Figure 4. Pay attention to the various sizes in the figure.