How to Desolder PCB: A Comprehensive Guide
Introduction to Desoldering
Desoldering is an essential skill for anyone working with printed circuit boards (PCBs), whether you’re a professional electronics technician, a hobbyist, or a DIY enthusiast. The process involves removing solder components from a PCB to repair, replace, or salvage components. Proper desoldering techniques can mean the difference between successfully fixing a circuit board and damaging it beyond repair.
In this comprehensive guide, we’ll explore various methods of desoldering, the tools required, safety precautions, and step-by-step instructions to help you master this critical skill in electronics work.
Understanding the Basics of Desoldering
Before diving into the practical aspects, it’s important to understand what desoldering entails. Soldering creates a metallurgical bond between component leads and PCB pads by melting solder (typically a tin-lead or lead-free alloy). Desoldering reverses this process by:
- Re-melting the solder
- Removing the molten solder from the joint
- Freeing the component lead from the PCB
The challenge lies in doing this without damaging the PCB traces (which are delicate copper pathways laminated onto the board) or the component you may wish to reuse.
Essential Tools for Desoldering
Having the right tools makes desoldering significantly easier and safer. Here are the most common desoldering tools:
1. Soldering Iron
A good-quality temperature-controlled soldering iron is fundamental. For most PCB work, a 25-40 watt iron with a fine tip works well. Higher wattage irons (60W+) may be needed for larger components or ground planes that dissipate heat quickly.
2. Desoldering Pump (Solder Sucker)
This spring-loaded vacuum device creates suction to remove molten solder. It’s one of the most common and affordable desoldering tools.
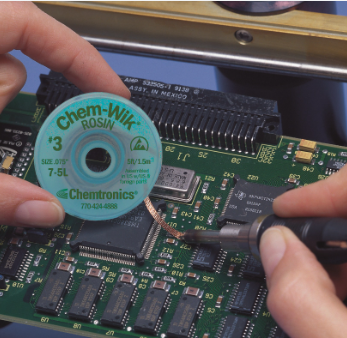
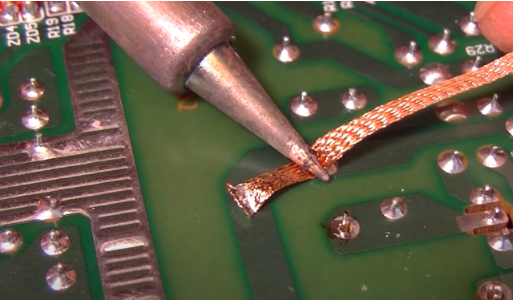
3. Solder Wick (Desoldering Braid)
A braid of fine copper wires coated with flux that wicks up molten solder through capillary action when pressed with a hot iron.
4. Hot Air Rework Station
A specialized tool that blows hot air to melt solder on surface-mount components. More expensive but essential for modern SMD work.
5. Desoldering Gun
Combines a soldering iron with a built-in vacuum pump for one-handed operation. Efficient but typically more expensive.
6. Tweezers and Tools
Non-magnetic tweezers, dental picks, and other small tools help manipulate components during desoldering.
7. Flux
Additional flux (rosin or no-clean) improves solder flow during desoldering.
8. Safety Equipment
Safety glasses, fume extractor or ventilation, heat-resistant mat, and ESD protection when working with sensitive components.
Step-by-Step Desoldering Techniques
Method 1: Using a Solder Sucker
- Prepare Your Workspace: Ensure good ventilation, stable work surface, and proper lighting. Secure the PCB if necessary.
- Heat the Joint: Apply the soldering iron tip to the solder joint to melt the existing solder. For lead-free solder, you may need higher temperatures (300-350°C vs 250-300°C for leaded solder).
- Apply the Solder Sucker:
- For spring-loaded suckers: Push down the plunger, position the nozzle close to (but not touching) the joint, then press the release button as you maintain heat.
- For bulb-type suckers: Squeeze the bulb, heat the joint, then place the nozzle over the molten solder and release the bulb.
- Remove Excess Solder: You may need to repeat the process if all solder isn’t removed in one attempt. Add fresh solder if needed to improve heat transfer.
- Free the Component: Once most solder is removed, gently wiggle the component lead while heating to release it from the hole.
Method 2: Using Solder Wick
- Select Appropriate Braid: Choose a width matching the solder pad size. Wider braid for larger pads, narrower for small SMD pads.
- Apply Flux: Adding flux to the braid improves its solder-wicking capability.
- Position the Braid: Place the braid over the solder joint you want to desolder.
- Apply Heat: Press the soldering iron tip on top of the braid over the joint. The solder will melt and be drawn into the braid.
- Remove the Braid: Lift both the iron and braid away once the solder is absorbed. Use clean sections of braid for each joint.
- Inspect: The pad should appear clean with minimal solder residue. Repeat if necessary.
Method 3: Desoldering Surface Mount Components
- Apply Flux: Flux helps transfer heat and improves solder flow.
- Heat Both Ends: For two-terminal components (like resistors, capacitors), alternate heating each end until the component can be lifted with tweezers.
- Use Hot Air for Multi-pin Components:
- Set the air station to appropriate temperature (typically 300-350°C)
- Apply heat evenly across all pins while gently lifting the component with tweezers
- Use nozzle size appropriate for the component to avoid heating nearby parts
- Clean the Pads: Use solder wick to remove excess solder from pads after component removal.
Advanced Desoldering Techniques
For Multi-pin Through-Hole Components (ICs, connectors):
- Use a Desoldering Gun: The integrated vacuum makes removing many pins efficient.
- Solder Wave Method:
- Flood all pins with fresh solder to create one continuous “wave”
- Simultaneously heat all pins while gently lifting the component
- Requires good heat control to avoid PCB damage
- Pin-by-Pin with Solder Wick:
- Methodically remove solder from each pin
- Straighten pins as you go to ease removal
For Plated Through-Holes:
- Be extra cautious as excessive heat can damage the plating
- Consider using lower temperatures and more flux
- If a hole becomes blocked, use a toothpick or specialized PCB hole cleaner while solder is molten
Common Desoldering Challenges and Solutions
1. Stubborn Solder That Won’t Melt
- Cause: Large ground planes or heat sinks dissipating heat
- Solution: Use higher wattage iron, add fresh solder to improve heat transfer, or preheat the board
2. Lifted Pads
- Cause: Excessive force or heat damaging the pad’s adhesion to the PCB
- Prevention: Be gentle, don’t force components, use adequate but not excessive heat
3. Clogged Through-Holes
- Solution: Apply fresh solder and use a solder sucker again, or use a dental pick while heating to clear
4. Solder Bridges After Removal
- Solution: Use solder wick to clean up excess between pins or pads
5. Component Damage During Removal
- Prevention: Work patiently, ensure all solder is molten before attempting to remove, support the PCB
Safety Considerations
- Ventilation: Solder fumes can be harmful. Use a fume extractor or work in a well-ventilated area.
- Eye Protection: Molten solder can splatter. Safety glasses are recommended.
- Heat Protection: Be aware of hot tools and surfaces. Use proper stands for irons.
- ESD Protection: When working with sensitive components, use an anti-static mat and wrist strap.
- Lead Exposure: Wash hands after handling leaded solder and avoid touching your face while working.
Post-Desoldering PCB Care
After desoldering:
- Clean flux residues with isopropyl alcohol and a soft brush
- Inspect for damaged traces or pads
- If necessary, repair any damaged traces with jumper wires or conductive pen
- For through-hole components, ensure holes are clear before inserting new parts
Tips for Successful Desoldering
- Work Methodically: Rushing increases the risk of mistakes and damage.
- Keep Tools Clean: Regularly clean your iron tip and desoldering tools for best performance.
- Use Quality Materials: Cheap solder wick or poorly-made tools can make the job harder.
- Practice First: Experiment on old or discarded PCBs before working on valuable boards.
- Be Patient: Some components may require multiple attempts to remove safely.
Environmental Considerations
- Solder Waste Disposal: Solder containing lead should be disposed of as hazardous waste in many areas.
- Component Recycling: Many desoldered components can be reused or recycled.
- PCB Disposal: Some PCBs contain hazardous materials and should be recycled properly.
Conclusion
Mastering desoldering techniques is crucial for anyone working with electronic circuits. Whether you’re repairing devices, salvaging components, or modifying circuits, the ability to cleanly remove solder and components without damaging the PCB is an invaluable skill. By understanding the various methods, using the right tools, and practicing proper techniques, you can approach desoldering tasks with confidence.
Remember that like any skill, proficient desoldering comes with practice. Start with simple projects and gradually work up to more challenging desoldering tasks. With time and experience, you’ll develop the feel for how much heat to apply, when a joint is ready to be separated, and how to handle various component types.
By following the guidelines outlined in this article—prioritizing safety, using appropriate tools, and employing the right techniques for each situation—you’ll be well-equipped to tackle any desoldering task that comes your way in your electronics projects or repairs.