Mastering the Art of PCB Motherboard Assemblies: A Comprehensive Guide
Key Takeaways
PCB assembly is a critical skill that combines the meticulous selection of components and a deep understanding of design layout and schematics. This guide unravels the complexities involved in the assembly process, offering both beginners and seasoned technicians insights into precise and efficient methods. Emphasis is placed on mastering soldering techniques, ensuring connections are both reliable and durable. Additionally, it tackles common issues that arise during PCBA, providing actionable troubleshooting tips. By following this guide, you can elevate your ability to handle even the most intricate PCB projects, ensuring every assembly is executed with the utmost precision and confidence.
Introduction to PCB Motherboard Assemblies
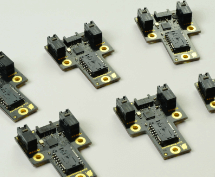
In the world of electronics, the PCB motherboard assembly forms the backbone of nearly every complex device. At its core, a PCB (printed circuit board) is a meticulously designed board layered with conductive pathways that connect various electronic components. The term PCBA (Printed Circuit Board Assembly) refers to the process whereby all necessary electronic components are mounted onto a PCB, transforming it into a fully functional motherboard ready for implementation.
The assembly of PCBs for motherboards requires precision and an in-depth understanding of both the design and the components involved. One must master various stages, from selecting appropriate materials and components to executing intricate soldering techniques with utmost accuracy. Each step in this process plays a critical role in determining the performance and reliability of the final product.
“A successful pcb assembly not only demands technical proficiency but also scrupulous attention to detail at every stage.”
To successfully navigate this intricate process, one must start by carefully choosing components that meet both quality standards and design specifications. Understanding schematics is equally crucial as it guides you through placing each component correctly.
Soldering is another pivotal aspect that demands finesse; even minor mistakes can lead to operational failures or compromised efficiency. Additionally, identifying and troubleshooting issues early in the process ensures minimal setbacks and efficient progress.
This article aims to equip you with all the necessary tools and knowledge required for mastering PCB motherboard assemblies. Whether you’re a beginner or a seasoned technician, this guide promises practical insights and expert advice tailored to enhance your skills and boost your confidence in tackling even the most challenging projects.
Selecting the Right Components for Your PCB
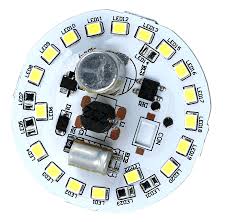
Successfully undertaking a pcb assembly project begins with selecting the right components for your PCB motherboard. The choice of components can significantly affect the overall performance, reliability, and efficiency of the finished product. Begin with a comprehensive understanding of your requirements, ensuring each component matches the specified electrical and thermal characteristics. Key elements include resistors, capacitors, transistors, diodes, and integrated circuits (ICs). Using a BOM (Bill of Materials) can help streamline this process by listing all necessary components.
Consider both active and passive components. Active components like ICs and transistors play a direct role in signal processing, whereas passive components such as capacitors and inductors manage voltage regulation and signal filtering. Ensure compatibility by cross-referencing datasheets to avoid mismatches in parameters like voltage ratings and power tolerances.
Additionally, environmental factors such as temperature ranges and potential exposure to humidity or corrosive environments must be factored into component selection to enhance the longevity of your PCBA. Opt for high-quality parts from reputable manufacturers to mitigate risks associated with counterfeit or substandard components.
Here is a simple table that may help you categorize these essential parts:
| Component Type | Function | Key Considerations |
|---|---|---|
| Resistors | Manage current flow | Resistance value, tolerance |
| Capacitors | Store electrical energy | Capacitance value, voltage rating |
| Transistors | Amplify signals | Type (NPN/PNP), gain |
| Diodes | Ensure current flow in one direction | Forward voltage drop, reverse current |
| ICs | Integrated functionalities for specific tasks | Pin configuration, power requirements |
By carefully selecting each part while considering their specifications and environmental resilience, you ensure that your pcb assembly is both robust and reliable.
Understanding the Design Layout and Schematics
In the realm of PCB assembly, comprehending the design layout and schematics is crucial for ensuring efficient and error-free motherboard assemblies. A well-crafted schematic acts as a blueprint, detailing the interconnections between various components. It is essential to accurately interpret these schematics to avoid misplacements that could lead to malfunctioning or damage.
Start by familiarizing yourself with the basic symbols and notations used in schematic diagrams. These symbols represent various electronic components such as resistors, capacitors, and integrated circuits. Understanding these symbols helps in identifying where each component should be placed on the PCB layout.
The next step involves translating the schematic into a physical layout on the PCB. This requires meticulous planning of component placement to ensure optimal performance and minimal interference. Tools such as EDA (Electronic Design Automation) software can significantly aid in this process by allowing for precise adjustments and visualization of the pcba layout.
It’s also important to pay attention to trace routing—the pathways that connect different components on the PCB. Proper trace routing minimizes electrical noise and signal loss, ensuring reliable operation of the motherboard. Using multi-layer boards can help manage complex routing by providing additional layers for signal paths.
In summary, mastering the design layout and schematics is a foundational skill in PCBA that requires careful study and practice. By understanding how to interpret schematics and translate them into efficient board layouts, you can enhance both your proficiency and confidence in assembling sophisticated motherboard projects.
Mastering Soldering Techniques for Precision
Achieving precision in PCB assembly hinges on mastering the art of soldering, a crucial skill for any technician. The foundation of a successful PCBA begins with a clean workspace and the right tools. Start by ensuring your soldering iron is set to the appropriate temperature, usually around 350°C, suitable for most leaded and lead-free solders. Flux, a chemical cleaning agent, is indispensable in this process; it removes oxidation from your components and promotes better solder flow. Applying flux to both the PCB pads and component leads ensures solid connections.
When working with motherboard assemblies, accuracy is vital. Place each component precisely onto its designated pad on the PCB, holding it steady with tweezers while applying heat from the soldering iron. Allow the solder to flow freely onto the joint before removing the heat, ensuring a shiny, concave fillet forms around both the pad and lead — an indication of a good connection.
Reflow soldering is another technique used often in PCBA for its efficiency and uniformity. In this method, components placed on solder paste-coated pads go through a controlled heating process in a reflow oven, creating simultaneous connections across multiple joints.
For fine-pitch components, opt for techniques like drag soldering or hot air rework stations to manage densely packed leads without causing bridges or shorts. Thorough inspection using magnification helps identify cold joints or excess solder blobs that could jeopardize circuit performance.
By fully understanding these techniques and incorporating regular practice and patience into your routine, you can achieve consistent results in motherboard PCB assembly—boosting both your competence and confidence in tackling even complex projects.
Troubleshooting Common Issues in PCB Assemblies
Troubleshooting common issues in PCB assemblies is a critical skill for any technician, whether a beginner or seasoned professional. Understanding the potential problems that can arise during the assembly process, from soldering to final testing, is essential for ensuring efficient and reliable outputs. One of the main challenges often encountered in a pcba is addressing poor solder joints, which can result from incorrect temperature settings or insufficient solder application. Crucial to overcoming this is mastering proper soldering techniques and maintaining well-calibrated equipment.
Another prevalent issue involves misalignment of components due to inaccurate placement or an erroneous design layout. It’s imperative to regularly verify the alignment using precise measurement tools and cross-referencing with original schematics. Additionally, thermal management problems can cause overheating in certain areas of the PCB, leading to malfunction or damage. Implementing effective cooling systems and heat sinks during the PCB design phase can mitigate this risk.
Short circuits are another common problem caused by solder bridges or conductive debris on the board. Thorough inspection under a magnifying lamp and use of specialized cleaning tools can help detect and remove these faults efficiently. For advanced troubleshooting, employing diagnostic tools like multimeters and oscilloscopes allows for detailed analysis of circuit behavior, helping to pinpoint issues quickly.
Finally, ensure consistent quality by adopting a systematic approach: regular inspections, testing at various stages, and keeping comprehensive documentation of each PCB assembly process will significantly reduce errors and improve overall performance. By mastering these troubleshooting techniques, you enhance your ability to deliver precise and reliable pcb assemblies, even when faced with complex challenges.
Step-by-Step Assembly Instructions for Beginners
Starting your journey in PCB assembly can seem daunting, but by breaking down the process into manageable steps, even beginners can achieve professional results. Begin by gathering all necessary components and tools. Ensuring you have a well-lit, static-free work area is crucial. Start with the lowest-profile components, such as resistors and diodes, inserting them into their designated spots on the PCB according to the schematic.
Next, secure these components by carefully soldering them to the board. It’s essential to master proper soldering techniques early on—use a clean tip on your soldering iron and apply solder only as needed to create reliable connections without causing heat damage. After completing the low-profile components, move on to larger parts like capacitors and ICs (Integrated Circuits).
Ensure that all connections are as per the design layout. Misalignment here can lead to misfunction or damage to other PCB assembly parts when powered up for testing. After placing and securing all components, conduct a thorough inspection using a magnifying glass to check for cold solder joints or bridges that may require rework.
For those components sensitive to heat, employ heat sinks during soldering to prevent damage. When you’ve successfully mounted all components, proceed to connect external interfaces such as power connectors and data ports. Conclude your assembly by performing continuity tests using a multimeter to verify each connection works correctly.
By following these careful steps, you’ll build up confidence in your pcba skills and achieve successful outcomes with your motherboards from start to finish.
Expert Tips for Efficient and Reliable Outputs
To achieve efficient and reliable PCB assembly outcomes, integrating expert advice into your workflow is crucial. One essential tip is to maintain a clean and organized workstation. Dust and debris can easily disrupt the assembly process, so a tidy environment is imperative. Another key aspect is to double-check all components before soldering, ensuring they match the design specifications. This step can prevent mistakes that are both time-consuming and costly to fix.
Using high-quality solder and flux can significantly impact the reliability of your PCBA. Opt for materials that provide excellent conductivity and durability; this not only enhances performance but also extends the lifespan of the motherboard. Additionally, employing consistent soldering techniques is vital. Whether using a soldering iron or reflow oven, uniform heat application helps avoid cold joints and other common issues.
Another invaluable tip is to implement thorough testing procedures at various stages of the assembly process. Early detection of defects allows for timely corrections, ensuring the final product meets all required standards. Tools such as multimeters and oscilloscopes can be instrumental in these tests.
Finally, staying updated with the latest advancements in PCB technology can give you an edge in improving efficiency. Participating in workshops or online courses can keep your skills sharp and introduce you to innovative techniques that enhance output reliability.
By incorporating these expert tips into your routine, you can achieve superior precision and efficacy in your PCB motherboard assemblies, ultimately leading to higher quality results and increased client satisfaction.
Enhancing Skills for Complex PCB Projects
To excel in PCB assembly and tackle more complex projects, it is essential to elevate your skill set continually. Advanced pcba projects demand a keen eye for detail and a thorough understanding of intricate design specifications. Start by familiarizing yourself with different types of components and their roles within the circuit. Comprehensive knowledge of schematics and the ability to interpret them accurately is crucial.
Next, refine your soldering techniques to ensure precision and reliability. Practice makes perfect—repeated experience with various soldering tasks enhances dexterity and control, which are vital for complex assemblies. Moreover, invest time in learning about different testing methods to verify the integrity of your work. Knowing how to troubleshoot effectively will save time and reduce errors.
Engage with expert resources such as industry forums, technical workshops, and professional courses that offer insights into advanced methods and industry standards. Being well-versed in these areas not only augments your technical capabilities but also boosts your confidence in handling sophisticated PCB projects.
Lastly, develop a meticulous approach to project documentation and organization. Keeping detailed records of processes, components used, and issues encountered can provide valuable references for future projects. By enhancing these critical skills, you can ensure precise and efficient outcomes in all your PCB motherboard assemblies endeavors.
Conclusion
In conclusion, mastering pcb assembly for motherboards is crucial for any technician aiming to deliver high-quality, reliable electronic devices. By following the guidelines provided in this comprehensive guide, you can enhance your knowledge and skills in PCBA. From selecting the appropriate components and understanding intricate design layouts to perfecting your soldering techniques and effectively troubleshooting common issues, each aspect of the process has been meticulously covered. Armed with this information, both beginners and experienced technicians will find themselves more confident in tackling complex projects. Remember, precision and attention to detail are paramount in ensuring successful and efficient PCB motherboard assemblies.
FAQs
Q1: What is PCB assembly (PCBA)?
PCB assembly, or PCBA, involves the process of connecting various electronic components to a printed circuit board to create a functional motherboard. This process includes several steps such as soldering, placement of components, inspection, and testing to ensure the motherboard operates correctly.
Q2: What tools and materials are needed for PCB assembly?
For PCBA, you typically need soldering irons, solder wire, flux, tweezers, magnifying glasses or microscopes for inspection, and various testers like multimeters. Specific tools may vary depending on the complexity of the motherboard you’re assembling.
Q3: How do you ensure precision in soldering techniques?
Precision in soldering for PCB assemblies can be achieved by using temperature-controlled soldering irons and high-quality flux. Additionally, practicing good hand-eye coordination and maintaining a clean workspace can significantly improve your soldering accuracy.
Enhance Your PCB Assembly Skills
For more detailed insights and professional guidance on PCB assemblies, please visit AndwinPCB. Click here to enhance your expertise!